
Everyday Cardigan in Turquoise

IMG_1828
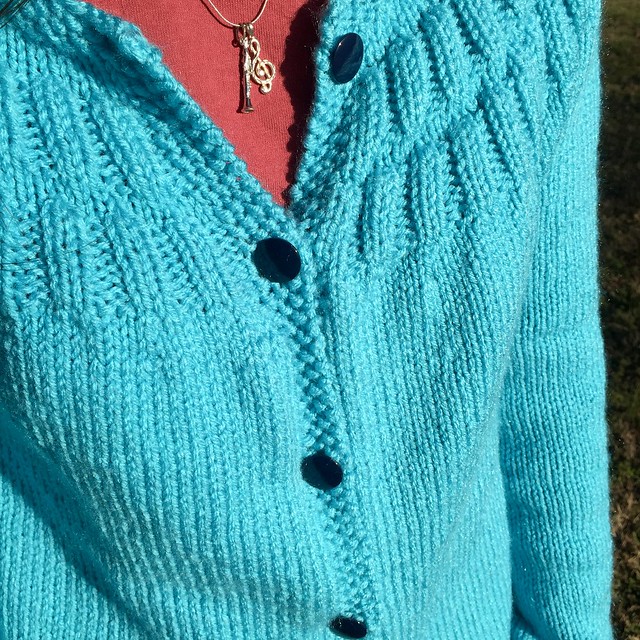
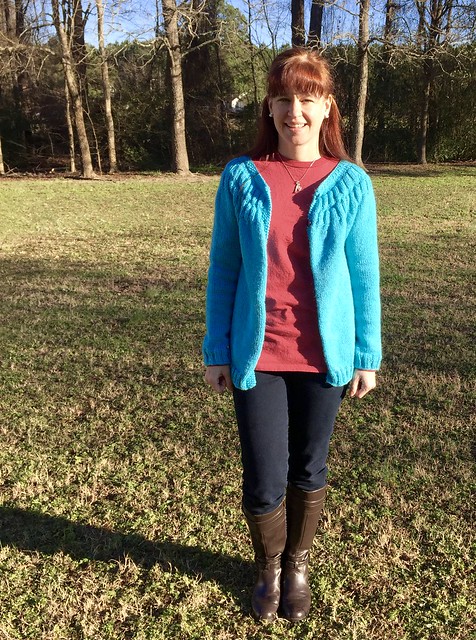
Once I find a pattern I like, it is common for me to make many items from the same design. The first time is usually a test run and I find out new techniques. The second try is almost always better! I can make it faster and can zip through the process. This knitting pattern is called the Everyday Cardigan Lisa Clarke. I adore the button band however this time my button band wants to turn in. It might be because of the type of yarn I used, Red Heart Super Saver Yarn. It is very economical only costing $5 per skein. I also only needed 3 skeins. This is very cost-effective, however, my first Everyday Cardigan which was made out of wool did a better job laying flat after blocking.
Red Heart Super Saver Yarn is an all-purpose medium worsted weight yarn that is ideal for afghans, sweaters, and accessories. It is machine wash warm, tumble dry low, do not use bleach, do not iron, dry cleanable. It is 100% acrylic, Dye-Lot. #0512 Turquie.
IMG_1825 


Comments

Robin said…
Turquoise is on my favorite color list. Love the cardigan.
Zibergirl said…
I'm so jealous! I wish I could knit. Your sweater is really pretty and I can see why you would make it again and again. Congrats on such fine work!

Popular posts from this blog

Sweet Coin Purse Tutorial for Teacher Gifts

This time of year is so special to me because I get to show my gratitude for all of the hard work that goes into teaching my daughters. I love to make handmade gifts and this year is no exception. Since money does not grow on trees around here, I looked at my stash (I keep my scraps in hat boxes ) and tried to see what I had a lot of; small zippers, trims, Peltex strips ( from making iPad cases ), fabric scraps and some hardware for key fobs. So I set to work.  Materials: Plastic multipurpose 5" Zipper  Fabric Scraps Lightweight interfacing 808 Pellon Trims (We clipped  key fobs  with 1.5" swivel hooks onto our coin purses . There are tons of tutorials on making key fobs .) Step 1: Print out the Coin Purse Template  PDF.  Cut 2 main fabric, cut 2 lining and 2 interfacing using the template.  Optional: Cut a 2"X2" square of your choice main fabric or lining. This strip of fabric is used to clip a key fob to your coin purse later....

Veruca Salt Dress

Every year we perform a musical and one of the highlights for me as a theater mom and seamstress is I get to make costumes! I love sewing and when I can sew for a show or for a music reason it is awesome! This year was Willy Wonka and the Chocolate Factory and I was able to recreate Veruca's red dress. The first step is to find a sewing pattern that I can manipulate to look like what the character needs.  I wanted to make the dress out of Pont de Roma fabric so it moved with the actress. Then I remembered the  Marianne Dress by Christine Haynes , it is perfect because it also had a peter pan collar. The peter pan collar did have some issues. I did not want a t-shirt binding. Also, the back of the collar did not have a collar. I drafted a back collar piece and since the opening was not stretchy, I created a keyhole with a button and loop closure. I lengthened the sleeves and used the cuffs from the pattern for long sleeves. Next, we added the buttons! We al...

Fun in the Sun Mermaid Tutorial

Sewing Materials: 1/4 yard of Lycra or  5T or larger old swimsuit Thread Stretch Needle (helps) Sewing Machine and Sewing Notions Print the PDF patterns pieces out and tape them together. ✄✄✄✄✄✄✄✄✄✄✄ ✄✄✄✄ ✄✄ Step 1: Cutting Layout-  Place the templates over the fabric and cut. ✄✄✄✄✄✄✄✄✄✄✄ ✄✄✄✄ ✄✄ Step 2:   Fold the top edges of the mermaid tail and sew across. ✄✄✄✄✄✄✄✄✄✄✄ ✄✄✄✄ ✄✄ Step 3: Place the mermaid tale pieces right sides together. Sew around the mermaid tail using the stretch stitch, it looks like a bolt of lighting. ✄✄✄✄✄✄✄✄✄✄✄ ✄✄✄✄ ✄✄ Step 4: Flip the mermaid tail right side out using a chopstick.   Option: You can add Poly-fil to make the end of the tale puffy.   Set aside. ✄✄✄✄✄✄✄✄✄✄✄ ✄✄✄✄ ✄✄ Bodice   Step 1: Cut a bodice measuring  4.5” X1.5” or use template. ✄✄✄✄✄✄✄✄✄✄✄ ✄✄✄✄ ✄✄ Step 2: Fold the bodice right sides together and sew the  short ends making a loop. Use the e...