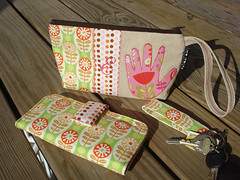
Being at the beach I thought I could use a wristlet to carry all of my small belongings. My daughters helped out too. We traced there hands on Heat n Bond Lite and ironed on the Heat n Bond Lite to their choice of fabric. Then I cut it out and stitched around the hand fabric onto the linen seen in the photo. We wanted more color so my girls helped me pick out the other patchwork pieces. The entire straight sewing my oldest daughter helped with. She even helped with the embroidery with the color of string and where to put it. She liked to watch the machine "draw". I love my wristlet and the memories we made making it. I hope that my girls will grow up enjoying sewing as much as I do.
This time of year is so special to me because I get to show my gratitude for all of the hard work that goes into teaching my daughters. I love to make handmade gifts and this year is no exception. Since money does not grow on trees around here, I looked at my stash (I keep my scraps in hat boxes ) and tried to see what I had a lot of; small zippers, trims, Peltex strips ( from making iPad cases ), fabric scraps and some hardware for key fobs. So I set to work. Materials: Plastic multipurpose 5" Zipper Fabric Scraps Lightweight interfacing 808 Pellon Trims (We clipped key fobs with 1.5" swivel hooks onto our coin purses . There are tons of tutorials on making key fobs .) Step 1: Print out the Coin Purse Template PDF. Cut 2 main fabric, cut 2 lining and 2 interfacing using the template. Optional: Cut a 2"X2" square of your choice main fabric or lining. This strip of fabric is used to clip a key fob to your coin purse later....

Comments