
Devon Baer Inspired Tunic

Have you ever seen something and wish you had the sewing pattern for? This happens to me a lot, especially looking at Pinterest and other websites. As I was looking around I saw this....
Honestly, I did not know where the ruffle collar shirt came from or who had designed the tunic. It was a picture I had found on Pinterest that did not have a link, I researched the image and found a boutique that sold the ruffle tunic called Devon Baer. These are beautiful tunics in bright gorgeous colors, ready for a day at the beach or on a boat. I loved looking at Devon Haire's designs and her online Boutique. It looks like she started at Etsy and expanded to her own shop. Next, I started to look for a similar sewing patterns. I wanted to make my own ruffle collar shirt. Of course the pattern was not available.
Untitled
So what did I do next? I looked through all of my sewing books and found Built by Wendy Dress book. This book has 3 style of dresses; the sheath dress, shift dress and dirndl dress. The pattern templates do not have seam allowances but that is so that you can create more designs with them.
Untitled
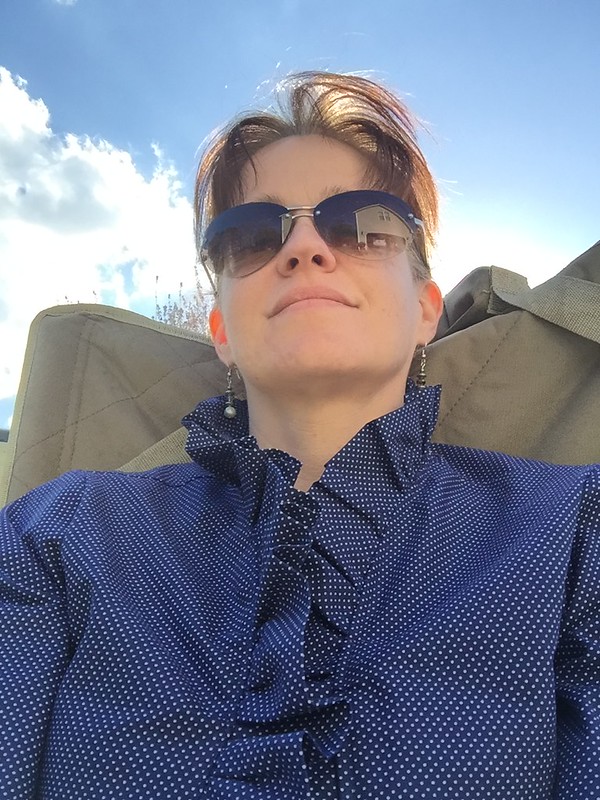
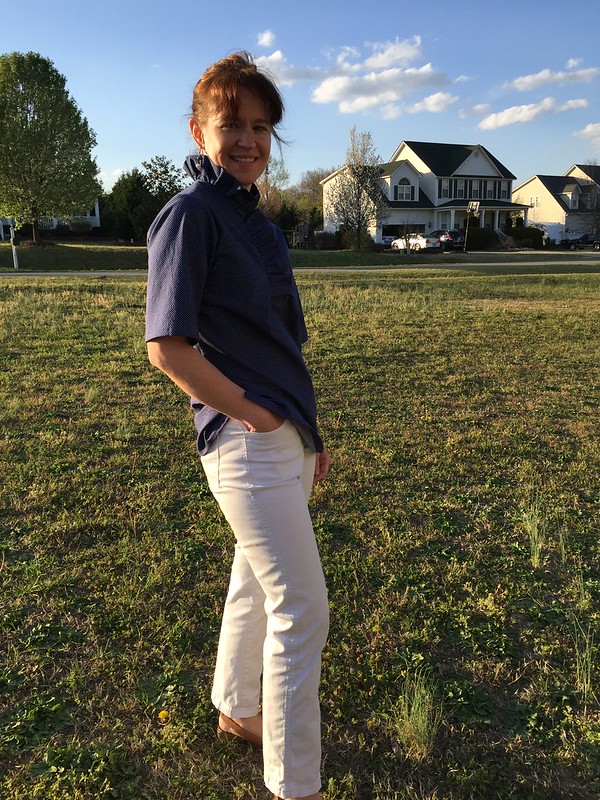
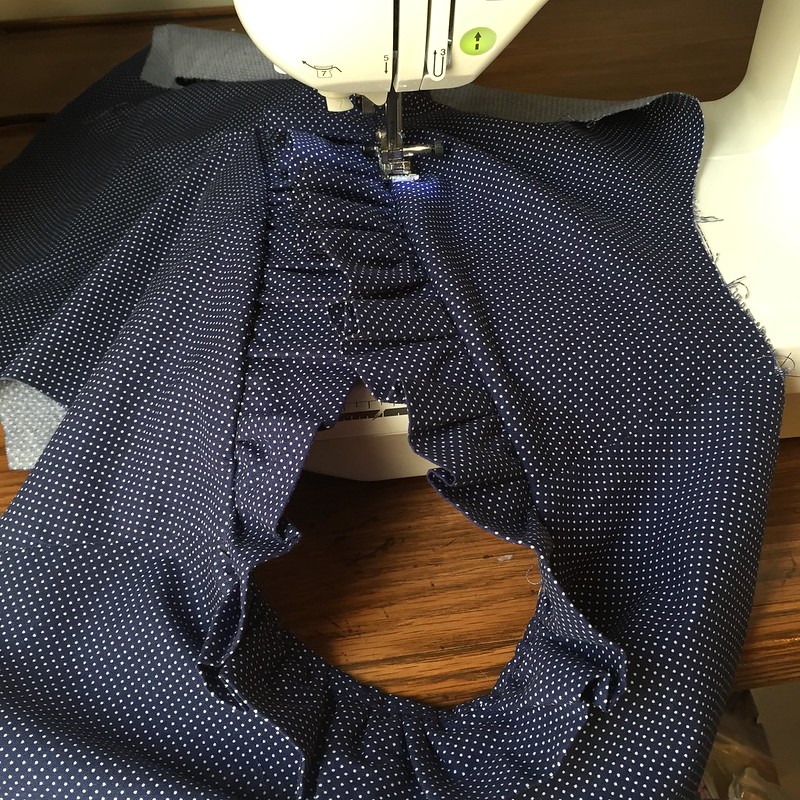
I used the shift dress template because it matched the overall shape of the shirt. Then I copied the template to a large piece of paper, adding a 1/2" seam allowance.  On the fold line, I cut the collar 6" down from the top and 1" wide across, so the 1" is doubled to 2" on the fold. I did have to make adjustments when sewing the collar into the shirt.  If I make this again I will probably make the ruffle a little wider.  I cut a 4" X 44" ruffle, folded it wrong sides together (hotdog style) and pressed it. Then I used a gather stitch so I could easily gather the raw edge side. The hardest part about making this shirt was figuring out how to sew in the ruffle collar. It is really a placket. I sewed the ruffle to the neck line first. I decided to bind it because if the ruffle turns out, then you would see the rough edge. I also used this placket tutorial from Indie Sew, mostly step #5, joining the plackets at the bottom.  Finally, I topstitched around the entire collar. The shift dress does have a dart and I did not create a dart in my shirt. (My second attempt, I might try it with the dart.)
IMG_1979
My sleeves were too short, so after washing it, I decided to remove the sleeves and have a sleeveless shirt. After making the tunic I went back to my original paper pattern pieces and made adjustments.
Untitled
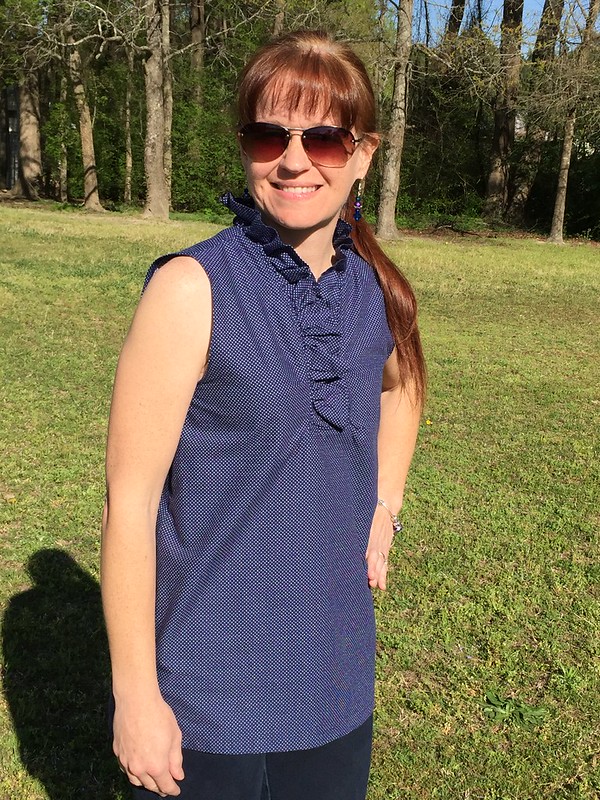
I can't believe I made this cute shirt. I will have to try it again. I definitely think Devon Baer's shirts are 100% better, but I have learned a lot trying to create my own. 
Happy Sewing!

Comments

Ginger saidā€¦
Your shirt turned out great!
Sew Spoiled saidā€¦
Thank you, I am hoping to make more. This style looks great with a cardigan sweater.
Heather saidā€¦
I have had this pinned forever too! I love that you did the heavy lifting on this.... now I'm going to pin YOR version. :) I hope I make this soon!
Heather saidā€¦
I have had this pinned forever too! I love that you did the heavy lifting on this.... now I'm going to pin YOR version. :) I hope I make this soon!
Jen saidā€¦
LOVE it!! This is also similar to the mudpie whitney shirt that I have been trying to find a pattern for. I've sewn for a long time but never used any of the Wendy books. Now I have one on order from Amazon and I totally plan to copy your shirt. Sooooo cute! Thanks for posting!

Popular posts from this blog

Sweet Coin Purse Tutorial for Teacher Gifts

This time of year is so special to me because I get to show my gratitude for all of the hard work that goes into teaching my daughters. I love to make handmade gifts and this year is no exception. Since money does not grow on trees around here, I looked at my stash (I keep my scraps in hat boxes ) and tried to see what I had a lot of; small zippers, trims, Peltex strips ( from making iPad cases ), fabric scraps and some hardware for key fobs. So I set to work.  Materials: Plastic multipurpose 5" Zipper  Fabric Scraps Lightweight interfacing 808 Pellon Trims (We clipped  key fobs  with 1.5" swivel hooks onto our coin purses . There are tons of tutorials on making key fobs .) Step 1: Print out the Coin Purse Template  PDF.  Cut 2 main fabric, cut 2 lining and 2 interfacing using the template.  Optional: Cut a 2"X2" square of your choice main fabric or lining. This strip of fabric is used to clip a key fob to your coin purse later....

Fun in the Sun Mermaid Tutorial

Sewing Materials: 1/4 yard of Lycra or  5T or larger old swimsuit Thread Stretch Needle (helps) Sewing Machine and Sewing Notions Print the PDF patterns pieces out and tape them together. āœ„āœ„āœ„āœ„āœ„āœ„āœ„āœ„āœ„āœ„āœ„ āœ„āœ„āœ„āœ„ āœ„āœ„ Step 1: Cutting Layout-  Place the templates over the fabric and cut. āœ„āœ„āœ„āœ„āœ„āœ„āœ„āœ„āœ„āœ„āœ„ āœ„āœ„āœ„āœ„ āœ„āœ„ Step 2:   Fold the top edges of the mermaid tail and sew across. āœ„āœ„āœ„āœ„āœ„āœ„āœ„āœ„āœ„āœ„āœ„ āœ„āœ„āœ„āœ„ āœ„āœ„ Step 3: Place the mermaid tale pieces right sides together. Sew around the mermaid tail using the stretch stitch, it looks like a bolt of lighting. āœ„āœ„āœ„āœ„āœ„āœ„āœ„āœ„āœ„āœ„āœ„ āœ„āœ„āœ„āœ„ āœ„āœ„ Step 4: Flip the mermaid tail right side out using a chopstick.   Option: You can add Poly-fil to make the end of the tale puffy.   Set aside. āœ„āœ„āœ„āœ„āœ„āœ„āœ„āœ„āœ„āœ„āœ„ āœ„āœ„āœ„āœ„ āœ„āœ„ Bodice   Step 1: Cut a bodice measuring  4.5ā€ X1.5ā€ or use template. āœ„āœ„āœ„āœ„āœ„āœ„āœ„āœ„āœ„āœ„āœ„ āœ„āœ„āœ„āœ„ āœ„āœ„ Step 2: Fold the bodice right sides together and sew the  short ends making a loop. Use the e...

Cute as a Button Bookmark Tutorial

These are called Cute as a Button Bookmakers. They are cheap, easy to make and are wonderful gifts!  All you need is  Bookmarkers/ PaperClips Size 45 or 1 1/8" Button Covers and kit Glue Gun Pliers (which you won't need if you get the flat back buttons). Step 1: Make a few fabric covered buttons.  These are size 45 or 1 1/8" buttons. Step 2: If you use normal buttons you will need to take the loops off to make them flat. However you can buy flat back buttons and not have to worry about the loop. Step 3: Add a dab of hot glue to the top of the large paperclip pad and place your fabric button on top of the glue. Step 4: Let it cool and it's ready to use! Happy Crafting!