
Crazy Cake!

This summer my girls and I are trying to find fun new things to do together. Yesterday, we made Crazy Cake! This recipe comes from an old children book that I kept from my childhood, "My Things to Do" Book. My grandmother, I call her "Momagrandma",  gave me this book when I was 7-ish.  I loved this book so much that when the book cover fell off I made my own cover. Somehow I lost the first 12 pages:).
Anyway, here is the recipe you will probably have everything you need in your cabinets. No eggs are added so it is ok to taste it before baking and everything goes into one pan (for easy clean up).
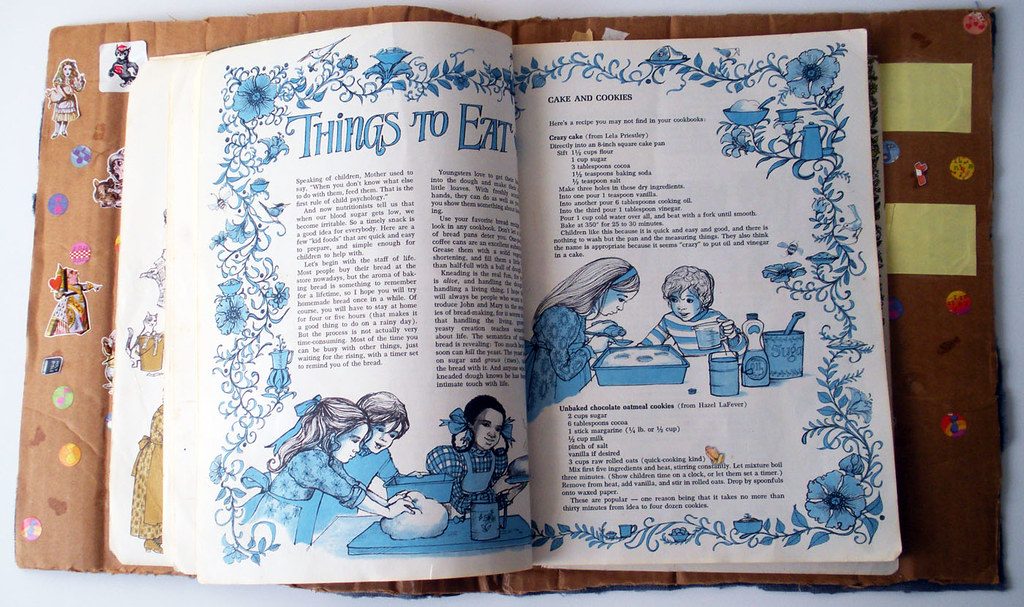
Crazy Cake! (from Lela Priestly, My Things To Do Book )
Directly into an 8" square cake pan
Sift 1 1/2 cups flour
1 cup sugar
3 tablespoon coca
1 1/2 teaspoon baking soda
1/2 teaspoon salt
Make 3 holes in these dry ingredients.
Into one pour 1 teaspoon vanilla. 
Into another pour 6 tablespoons cooking oil.
Into the third pour 1 tablespoon vinegar. (Crazy I know!)
Pour 1 cup cold water over all, and beat with a fork until smooth.
Bake at 350 degrees for 25-30 minutes.
We added icing but it does not need it. 
The Cover I made for my book when I was 8.
Happy Baking!
~Leah

Comments

Unknown said…
Hi, Leah!! I also have an old book I got from my grandma when I was a child. It's a story book. I love it!! It is more than a book to me. Bet you consider yours more than a simple book too! The cake looks scrumptious!!! Have a great day!! Bela.
Kirsty said…
This cake tastes great - I have the same recipe but we call it wacky chocolate cake. I make for my children occasionally as my oldest is allergic to egg. For his birthday I made 2, cut them in half and layered the 4 pieces with whipped cream for a special treat.
Carry Minarty said…
This is really a very awesome page.

Popular posts from this blog

Fun in the Sun Mermaid Tutorial

Sewing Materials: 1/4 yard of Lycra or  5T or larger old swimsuit Thread Stretch Needle (helps) Sewing Machine and Sewing Notions Print the PDF patterns pieces out and tape them together. ✄✄✄✄✄✄✄✄✄✄✄ ✄✄✄✄ ✄✄ Step 1: Cutting Layout-  Place the templates over the fabric and cut. ✄✄✄✄✄✄✄✄✄✄✄ ✄✄✄✄ ✄✄ Step 2:   Fold the top edges of the mermaid tail and sew across. ✄✄✄✄✄✄✄✄✄✄✄ ✄✄✄✄ ✄✄ Step 3: Place the mermaid tale pieces right sides together. Sew around the mermaid tail using the stretch stitch, it looks like a bolt of lighting. ✄✄✄✄✄✄✄✄✄✄✄ ✄✄✄✄ ✄✄ Step 4: Flip the mermaid tail right side out using a chopstick.   Option: You can add Poly-fil to make the end of the tale puffy.   Set aside. ✄✄✄✄✄✄✄✄✄✄✄ ✄✄✄✄ ✄✄ Bodice   Step 1: Cut a bodice measuring  4.5” X1.5” or use template. ✄✄✄✄✄✄✄✄✄✄✄ ✄✄✄✄ ✄✄ Step 2: Fold the bodice right sides together and sew the  short ends making a loop. Use the edge of the presser foot for your seam a

How to Line an A-Line Skirt Tutorial

 After you find an A-line skirt pattern , I am using  One Yard Wonders 101  template . Make a muslin of your skirt! It only takes a few minutes to make a muslin version. Just baste stitch the side seams and make adjustments for your hips. Once your template is right you can make all the skirts your heart desires, so it is important to get the perfect fit first. Now we are ready to cut the "good" fabric and sew! ---------------------------------- ---------------------------------- ---------------------------------- ---------------------------------- Flip the skirt right side out and put it on!! You are done!! It is super easy and your new skirt will look store made.  Plus there is no hand stitching the lining to the main fabric. If you have any questions please comment below or email me at leah.sewspoiled@gmail.com .  WooHooo!! A-Line Skirt Pattern Finds

Sweet Coin Purse Tutorial for Teacher Gifts

This time of year is so special to me because I get to show my gratitude for all of the hard work that goes into teaching my daughters. I love to make handmade gifts and this year is no exception. Since money does not grow on trees around here, I looked at my stash (I keep my scraps in hat boxes ) and tried to see what I had a lot of; small zippers, trims, Peltex strips ( from making iPad cases ), fabric scraps and some hardware for key fobs. So I set to work.  Materials: Plastic multipurpose 5" Zipper  Fabric Scraps Lightweight interfacing 808 Pellon Trims (We clipped  key fobs  with 1.5" swivel hooks onto our coin purses . There are tons of tutorials on making key fobs .) Step 1: Print out the Coin Purse Template  PDF.  Cut 2 main fabric, cut 2 lining and 2 interfacing using the template.  Optional: Cut a 2"X2" square of your choice main fabric or lining. This strip of fabric is used to clip a key fob to your coin purse later. We used a 1.5