
Classy Marianne Dress, Round Two Challenge

1
I am having so much fun participating in the Sew Mama Sew, Super Online Sewing Match II. This week we were asked to make the Marianne Dress by Christine Haynes. I love the look of this dress, I will probably make the Marianne dress over and over again! Christine Haynes is a wonderful apparel designer and her instructions for this dress are extremely detailed. Since this dress is made from knit fabric each step was written for a conventional sewing machine, as well as a serger. I have noticed in all of Christine's patterns that she keeps things simple. Only using a few pieces of fabric to stitch together, this makes it easier for anyone to create her designs. 
2
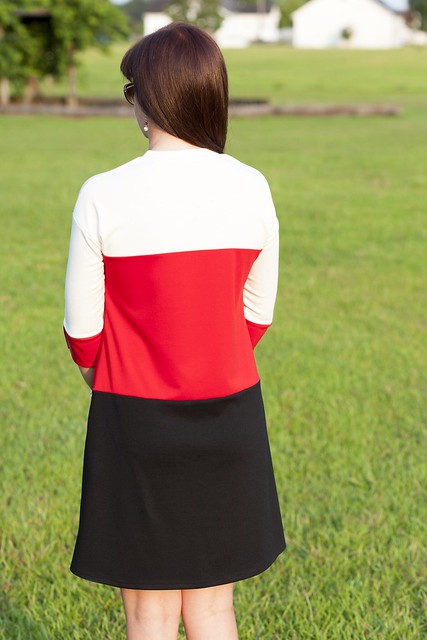
When I started looking for knit fabric for View B of the Marianne dress pattern. I looked for stripes. I assumed that I need a busy print or something with horizontal lines. It wasn't until I went fabric shopping, that I realized color blocking would give me a classic look. The fabrics I chose are solid red, white and black Ponte De Roma Fabrics. Ponte De Roma is a double knit fabric with tons of elasticity, it is a medium weight knit fabric, which helps hold this beautiful shift dress shape. Ponte De Roma medium weight fabrics can be worn all year long. I can wear my Marianne dress in the spring with flats, summer with sandals or in the fall and winter with boots and/or a scarf. 
3
After buying the fabrics, I tested out the pattern to check fitting. When researching this pattern online, I noticed that Christine Haynes had a Sew Along and blogged about each step of the pattern. This was yet another great tool to use for constructing this dress. In the pattern I was a size 6 (bust size 34"), however when looking at the finished garment size, the bust measured 37.5". I knew this would be too large for me since I am also petite. Plus, knit garments need to have a little negative ease, so that the knit fabric can stretch to give you a better over all fit. Size 4 is the size I created and I love the fit!!
Neckline
The color blocking was simple to figure out. I cut the front and back dress templates in half at the waist line and added a 3/8" seam allowance to both pieces. 
inside dress
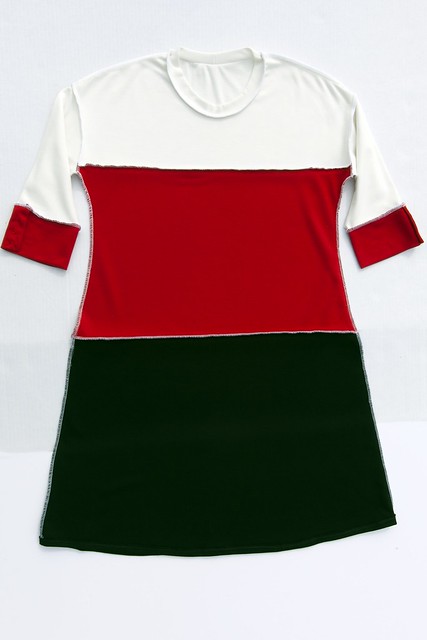
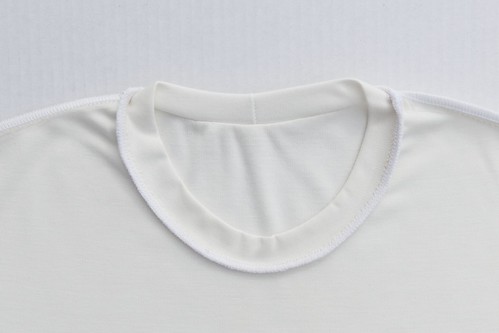
  • White fabric= front yoke, back yoke, collar and sleeves. 
  • Red fabric= cuffs and the top of the front and back dress templates.
  • Black fabric= the bottom of the front and back dress templates. 

Collar
I did notice that my serger stitching was with white thread and I could see the thread a little at the seams. To make sure the thread color matched the blocking, I used my sewing machine as well as the serger to interlock the stitches. At the end of the pattern instructions, when it was time to hem the dress, I serged the bottom with black thread, ironed the hem 1/2" and returned to my sewing machine to finish up.
sleeve
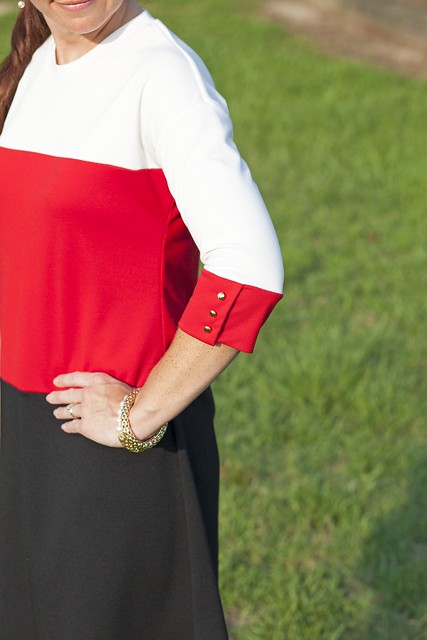
You could color block the Marianne dress using any colors of your choice. I used three colors here, however you could use two or more. It is fun to try and test out different options when you are color blocking. The cuff detail was another wonderful element of this dress. I used little gold buttons to finish the classic look. Overall this project was a huge success, I recommend this pattern to anyone. It is a timeless classic and easy to make. I can't wait to see the other Marianne dresses! All of the seamstresses are extremely talented, I feel honored to be in the contest. Best wishes and tons of stitches!

Comments

Unknown said…
Well done! I would wear this to work or out on the weekend. I'm glad you went with solids. Simplicity is beauty!
Heather said…
Love your dress! So classic but still fun. I especially love the buttons on the cuffs.
Kathleen said…
lovely job - the color blocking is beautiful. I'll probably copy!
Sew Spoiled said…
Thank you so much. I am excited about this dress in my wardrobe. I have been waiting to actually wear it, since we had to take pictures. Now I can wear it as much as I like. LOL
Shannon said…
I love the addition of the third colour blocking panel! Such a great colour combination too - so classic. Good luck!
Unknown said…
Hi Leah, I love your version of the Marianne Dress! It looks classic yet very contemporary with the great color blocking and choice of fabric. Good luck!
Sew Spoiled said…
Thank you Shannon. I am having a lot of fun.
Sew Spoiled said…
Thanks Barbara! Can't wait to see everyones dresses!
Anonymous said…
Color blocking is a great idea! It creates very flattering overall proportions. Good luck on round two!
I love how your color blocking gives it more of a 60's vibe! Nice choice with those bold colors :) Good luck!
Teresa said…
Leah - I love how the color blocking turned out for your dress! It looks so classic with the three colors!
Sew Spoiled said…
Thank you! Good luck to you too!
Anonymous said…
I love the color blocking! What a great idea!
I love the colour blocking on your dress! Such a classic and chic dress! Good Luck in making it to the next round!
Sew Spoiled said…
Thank you so much! It is so much fun being involved in this sewing competition. I have learn many new skills.
Anonymous said…
Thanks so much for your sweet comment on my community match entry at my blog! I love the color blocking idea for this dress! At first, I didn't think that the Marianne would be a style I would wear, but seeing your version is making me rethink my opinion. Yours looks great-- I love the bold colors you chose.
Becky Thompson said…
I really, really, really like your dress. I love color blocking and this is something that I would buy RTW. It's classic and perfect for you. Looks great!
Sew Spoiled said…
Thank you! It looks nice but feels comfortable to wear.
Ticket to Ride said…
Love it! Such a innovative take on this classic design. Good luck with Round Three!
Fashion Mozo said…
This is really an interesting blog and I like this dresses collection.

Popular posts from this blog

Fun in the Sun Mermaid Tutorial

Sewing Materials: 1/4 yard of Lycra or  5T or larger old swimsuit Thread Stretch Needle (helps) Sewing Machine and Sewing Notions Print the PDF patterns pieces out and tape them together. ✄✄✄✄✄✄✄✄✄✄✄ ✄✄✄✄ ✄✄ Step 1: Cutting Layout-  Place the templates over the fabric and cut. ✄✄✄✄✄✄✄✄✄✄✄ ✄✄✄✄ ✄✄ Step 2:   Fold the top edges of the mermaid tail and sew across. ✄✄✄✄✄✄✄✄✄✄✄ ✄✄✄✄ ✄✄ Step 3: Place the mermaid tale pieces right sides together. Sew around the mermaid tail using the stretch stitch, it looks like a bolt of lighting. ✄✄✄✄✄✄✄✄✄✄✄ ✄✄✄✄ ✄✄ Step 4: Flip the mermaid tail right side out using a chopstick.   Option: You can add Poly-fil to make the end of the tale puffy.   Set aside. ✄✄✄✄✄✄✄✄✄✄✄ ✄✄✄✄ ✄✄ Bodice   Step 1: Cut a bodice measuring  4.5” X1.5” or use template. ✄✄✄✄✄✄✄✄✄✄✄ ✄✄✄✄ ✄✄ Step 2: Fold the bodice right sides together and sew the  short ends making a loop. Use the edge of the presser foot for your seam a

How to Line an A-Line Skirt Tutorial

 After you find an A-line skirt pattern , I am using  One Yard Wonders 101  template . Make a muslin of your skirt! It only takes a few minutes to make a muslin version. Just baste stitch the side seams and make adjustments for your hips. Once your template is right you can make all the skirts your heart desires, so it is important to get the perfect fit first. Now we are ready to cut the "good" fabric and sew! ---------------------------------- ---------------------------------- ---------------------------------- ---------------------------------- Flip the skirt right side out and put it on!! You are done!! It is super easy and your new skirt will look store made.  Plus there is no hand stitching the lining to the main fabric. If you have any questions please comment below or email me at leah.sewspoiled@gmail.com .  WooHooo!! A-Line Skirt Pattern Finds

Sweet Coin Purse Tutorial for Teacher Gifts

This time of year is so special to me because I get to show my gratitude for all of the hard work that goes into teaching my daughters. I love to make handmade gifts and this year is no exception. Since money does not grow on trees around here, I looked at my stash (I keep my scraps in hat boxes ) and tried to see what I had a lot of; small zippers, trims, Peltex strips ( from making iPad cases ), fabric scraps and some hardware for key fobs. So I set to work.  Materials: Plastic multipurpose 5" Zipper  Fabric Scraps Lightweight interfacing 808 Pellon Trims (We clipped  key fobs  with 1.5" swivel hooks onto our coin purses . There are tons of tutorials on making key fobs .) Step 1: Print out the Coin Purse Template  PDF.  Cut 2 main fabric, cut 2 lining and 2 interfacing using the template.  Optional: Cut a 2"X2" square of your choice main fabric or lining. This strip of fabric is used to clip a key fob to your coin purse later. We used a 1.5