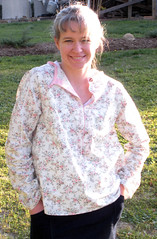
I have bought many sewing books but Weekend Sewing just might be my favorite. I love the great pictures, templates for all of the projects and the online help on Heather's blog. My first project was the summer blouse. This is my thoughts on the whole project...
First, I have to admit, before this project I hated this fabric! I could not see it on a bag, house decor., much less on clothing! I had even forgotten that I had this fabric in my stash all together. When I found out that I needed two yards of fabric I started searching and this is what I found at the bottom of my stash. For me, this project made me realize that every print has a place. Which means every piece a fabric can look right as long as it is matched up with the right pattern or project. Now I have started looking at the rest of my stash wondering what new directions I can go.
Second, I learned about the placket, an opening in a garment! For me it was like learning how to sew a button. This is a wonderful tool I can see myself experimenting with it in shirts, night gowns and dresses!
Third, I exposed the binding along the top of the blouse. I liked the contrast! I did use the button tutorial but I have seen a few just use the blinding as ties and I thought that was really cute too.
Fourth, I put the sleeves on a little differently. I think it might be an easier way so I am going to share:) I did sew the top shoulder seams and finished the placket as it states in the book. Next I sewed the curved part of the shoulder of the sleeve, (right sides together) to the blouse. I ironed the ends of the sleeves for the hem and ironed the hem for the bottom of the blouse. I pinned the sleeve and side of the blouse right sides together and sewed the seam closed. Finally, I ironed the hem again but this time it is even easier because I had already ironed it once before, sewed the hem into place and I was done!
I joined the flickr group for Weekend Sewing. It is a fun way to see all of the great creativity out there!! Plus you can add your photos of project you have completed:)
Happy sewing!
Leah

Comments