
Trying to do the right thing...

It has bothered me greatly that some people, including me, seem to be having a problem with the presentation of my Weekender Tote pattern as it appears in the Feb./March 2010 issue of Sew News Magazine. It is apparent that a pattern that is originally 19 pages long should not be condensed into 2 pages of helpful tips. So to this end I have decided to try to do the right thing by correcting the problem and offer the full pattern for free on my website.  If there are any problems with the complete version of the pattern, please do not hesitate to contact me directly at leah.sewspoiled@gmail.com.
Happy Sewing! ~Leah

Comments

Dorothy said…
Wow!! Thank you. I was planning to make this bag but had not got round to it. Maybe I will now.
Sincerely, Dorothy
Elena said…
Thanks Leah! You're an absolute doll! I bought that issue specifically to make your bag and now I'll have even more help. I'm sure it will come in handy for all the summer weekend jaunts I have planned.
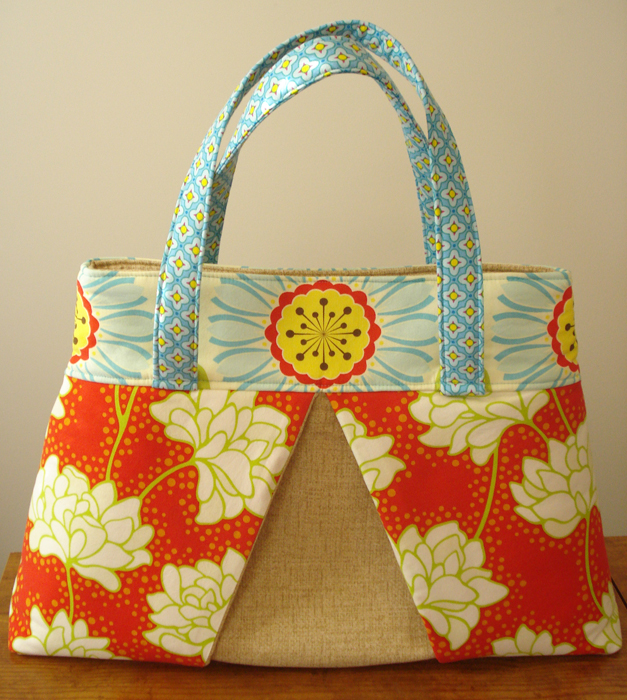
Question: What solid is that? Linen? I can never figure out which linen will work best. I tried one once and found that it stretched and distorted itself every which way.
Kelly O. said…
that is incredibly kind of you!
Terrie Sandelin said…
This is really very generous -- thank you!
Christine said…
It is always so hard when books and magazines want condensed versions of patterns. It is very generous of you to offer the pattern for free and I am sure many people will remember that generosity and have a loyalty to your patterns because of it. Thank you!
Country Mouse said…
This is so sweet of you! Thank you so much! I love it and can't wait to stitch it up!
Goosegirl said…
Oh my goodness! Thank you! It is beautiful!
Sew Spoiled said…
Thank you to everyone who has written you have made me feel better about this decision. I work very hard on these patterns and I want to make it easy for the seamstress to get the end product at the end of their sewing journey.
Elena, it was a linen however I found in the upholstery section at Joann's so it was heavier in the weight and I did not have any problems with it stretching.
Smiles!
~Leah
Kirsty said…
Thanks Leah - I am off to Fiji in a few weeks for my 15th Wedding Anniversary. It will be nice to make something just for me. Kirsty
Ginger said…
Wow, that's very generous of you. Thank you!
Pinktulip said…
Thank you so much for being so generous. I recently purchased this magazine, purely for your bag pattern, and plan to make the bag this weekend. Now I know I can do it correctly.
di said…
I am so sorry that your pattern wasn't represented properly, Leah. You are so generous for sharing the pattern with us! It is the cutest bag and I can't wait to make one! I'm hoping to join in on the sew-along, too. Thanks so much!
Robyn said…
So wonderful of you! I love making bags and I'm always looking for new ones. I'm a new follower of your blog and I'm hoping to get one (or two...) of these made soon!
Thank you!

Popular posts from this blog

Sweet Coin Purse Tutorial for Teacher Gifts

This time of year is so special to me because I get to show my gratitude for all of the hard work that goes into teaching my daughters. I love to make handmade gifts and this year is no exception. Since money does not grow on trees around here, I looked at my stash (I keep my scraps in hat boxes ) and tried to see what I had a lot of; small zippers, trims, Peltex strips ( from making iPad cases ), fabric scraps and some hardware for key fobs. So I set to work.  Materials: Plastic multipurpose 5" Zipper  Fabric Scraps Lightweight interfacing 808 Pellon Trims (We clipped  key fobs  with 1.5" swivel hooks onto our coin purses . There are tons of tutorials on making key fobs .) Step 1: Print out the Coin Purse Template  PDF.  Cut 2 main fabric, cut 2 lining and 2 interfacing using the template.  Optional: Cut a 2"X2" square of your choice main fabric or lining. This strip of fabric is used to clip a key fob to your coin purse later....

Veruca Salt Dress

Every year we perform a musical and one of the highlights for me as a theater mom and seamstress is I get to make costumes! I love sewing and when I can sew for a show or for a music reason it is awesome! This year was Willy Wonka and the Chocolate Factory and I was able to recreate Veruca's red dress. The first step is to find a sewing pattern that I can manipulate to look like what the character needs.  I wanted to make the dress out of Pont de Roma fabric so it moved with the actress. Then I remembered the  Marianne Dress by Christine Haynes , it is perfect because it also had a peter pan collar. The peter pan collar did have some issues. I did not want a t-shirt binding. Also, the back of the collar did not have a collar. I drafted a back collar piece and since the opening was not stretchy, I created a keyhole with a button and loop closure. I lengthened the sleeves and used the cuffs from the pattern for long sleeves. Next, we added the buttons! We al...

Fun in the Sun Mermaid Tutorial

Sewing Materials: 1/4 yard of Lycra or  5T or larger old swimsuit Thread Stretch Needle (helps) Sewing Machine and Sewing Notions Print the PDF patterns pieces out and tape them together. ✄✄✄✄✄✄✄✄✄✄✄ ✄✄✄✄ ✄✄ Step 1: Cutting Layout-  Place the templates over the fabric and cut. ✄✄✄✄✄✄✄✄✄✄✄ ✄✄✄✄ ✄✄ Step 2:   Fold the top edges of the mermaid tail and sew across. ✄✄✄✄✄✄✄✄✄✄✄ ✄✄✄✄ ✄✄ Step 3: Place the mermaid tale pieces right sides together. Sew around the mermaid tail using the stretch stitch, it looks like a bolt of lighting. ✄✄✄✄✄✄✄✄✄✄✄ ✄✄✄✄ ✄✄ Step 4: Flip the mermaid tail right side out using a chopstick.   Option: You can add Poly-fil to make the end of the tale puffy.   Set aside. ✄✄✄✄✄✄✄✄✄✄✄ ✄✄✄✄ ✄✄ Bodice   Step 1: Cut a bodice measuring  4.5” X1.5” or use template. ✄✄✄✄✄✄✄✄✄✄✄ ✄✄✄✄ ✄✄ Step 2: Fold the bodice right sides together and sew the  short ends making a loop. Use the e...