
Gathered Pockets Tutorial: Cabrio Tote Sew Along!

If you can’t find fold over elastic there are 2 other ways to get the same effect! Here is a quick tutorial on two different ways to gather pockets!
Sewalong%285%29-2011-02-27-21-00.jpg
Pocket A:
First fold the 7”X 14” pocket fabric in half to find the center. Draw a chalk line 1/2” below the center line. Set up your machine for shirring and shirr the fabric across the chalk line.
Sewalong%284%29-2011-02-27-21-00.jpg
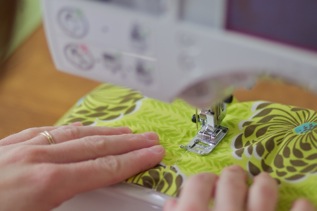
It should start to pucker up and the gather as you sew across the pocket.
OR
Sewalong%283%29-2011-02-27-21-00.jpg
Pocket B:
Fold the fold the 7”X 14” pocket fabric in half to find the center. Draw a chalk line 1/2” below the center line on the back of the pocket fabric. Place one piece of 1/4” wide elastic measuring 10” along the chalk line. Set your sewing machine to a wide, open zig zag stitch. While you stretch the elastic zig zag stitch in a straight line.
Sewalong%282%29-2011-02-27-21-00.jpg
Pin your pocket right sides together! The 1/4” elastic is on the left side and the elastic thread technique is on the right side.
Sewalong%281%29-2011-02-27-21-00.jpg
Sew down the two sides, tack stitching the elastic at the top of the pockets.
Sewalong-2011-02-27-21-00.jpg
Turn right side out and iron! With a hot press the pockets will gather even more!
Now you are ready to use your pockets according to the Cabrio Tote Pattern!
Happy Sewing!
6429E12C38E1D1A63D84EB0D937554A4-2011-02-27-21-00.png

Comments

Kelly Rachel said…
These are great instructions, thanks Leah! Will see what I can do as I don't have the elastic.
Kimminita said…
Thanks so much! Getting on it first thing tomorrow!
Unknown said…
HELP!!!! I am still back on the gathering of the bottom lining step. I CAN NOT get the fabric to gather - it seems too stiff with the lining on the back. Each time I pull the threads, the string breaks before I can get it gathered fully! I could use some more tips before my machine goes through the window! :)
Sew Spoiled said…
There is another way!
Take a long piece of floss and zig zag stitch over the floss. (Make sure the floss is not sewn.) When you are finished sewing a zig zag stitch over the floss for the length of the project pull the fabric and it will gather for you just like a shower curtain on a straight rod.
Best Wishes!
Leah

Popular posts from this blog

Sweet Coin Purse Tutorial for Teacher Gifts

This time of year is so special to me because I get to show my gratitude for all of the hard work that goes into teaching my daughters. I love to make handmade gifts and this year is no exception. Since money does not grow on trees around here, I looked at my stash (I keep my scraps in hat boxes ) and tried to see what I had a lot of; small zippers, trims, Peltex strips ( from making iPad cases ), fabric scraps and some hardware for key fobs. So I set to work.  Materials: Plastic multipurpose 5" Zipper  Fabric Scraps Lightweight interfacing 808 Pellon Trims (We clipped  key fobs  with 1.5" swivel hooks onto our coin purses . There are tons of tutorials on making key fobs .) Step 1: Print out the Coin Purse Template  PDF.  Cut 2 main fabric, cut 2 lining and 2 interfacing using the template.  Optional: Cut a 2"X2" square of your choice main fabric or lining. This strip of fabric is used to clip a key fob to your coin purse later....

Veruca Salt Dress

Every year we perform a musical and one of the highlights for me as a theater mom and seamstress is I get to make costumes! I love sewing and when I can sew for a show or for a music reason it is awesome! This year was Willy Wonka and the Chocolate Factory and I was able to recreate Veruca's red dress. The first step is to find a sewing pattern that I can manipulate to look like what the character needs.  I wanted to make the dress out of Pont de Roma fabric so it moved with the actress. Then I remembered the  Marianne Dress by Christine Haynes , it is perfect because it also had a peter pan collar. The peter pan collar did have some issues. I did not want a t-shirt binding. Also, the back of the collar did not have a collar. I drafted a back collar piece and since the opening was not stretchy, I created a keyhole with a button and loop closure. I lengthened the sleeves and used the cuffs from the pattern for long sleeves. Next, we added the buttons! We al...

May 2011 Giveaway!

Thank you Sew Mama Sew for making today, May 23, 2011 Giveaway Day! Sew Love Fabrics will be sponsoring this month’s giveaway with eight fat quarters (18”X 22”) of Prince Charming prints in olive green, equaling 2 yards of gorgeous fabrics! If you would like to read more about Ruth, founder of Sew Love Fabrics , read her interview . Thank you so much for sharing your love of fabric with us! These are the fat quarters ready to ship to the lucky winner!! Giveaway Rules! +Our Giveaway will run May 23-27, 2011, with the winner being announced May 28, 2011! +The winner will be selected by Random.org +The package will be shipped to the winner by May 30, 2011. + To enter to win post a comment on this blog post! +Only one comment please per person. +This giveaway is open to everyone. +Leave your EMAIL ADDRESS, you can leave it as: leah(dot)sewspoiled(at)gamil(dot)com +This giveaway ends May 27, 2011 at 8PM Eastern Standard Time Thank you Ruth for sponsoring our May giveaway from Sew Love ...