
Portfolio Dress

Screenshot2011-05-12at6.31.25PM-2011-05-12-12-48.png
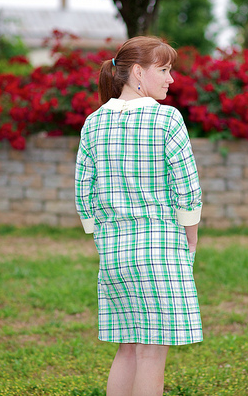
This is my new plaid portfolio dress! The pattern is the Lisette, Portfolio Dress by Liesl Gibson of Oliver+S!
Fun Fact: Did you know that Liesl Gibson designed for Tommy Hilfiger and Ralph Lauren?
My favorite features of the dress are the pockets, how comfy it feels to wear and the look. I bought the plaid originally because I fell in love with the colors. Honestly, I did not think about lining up all of the lines until I sat down with all of the template pieces around me! (I think I actually screamed, “What was I thinking!”)
Screenshot2011-05-04at12.48.48PM-2011-05-12-12-48.png
Really the dress was very easy to put together, until I got to the collar. My collar did not fit like it was supposed to because I had shifted the plaid a little to make sure all of the lines met up. (It was totally my fault!)
Shifting the fabric created my neck line where the collar was to be attached to be different. I ended up fixing it by pinning the collar together at the shoulder’s seams, lining the collar up with the top of the dress and drawing new seam allowances everywhere to make it fit. .
Screenshot2011-05-12at6.41.28PM-2011-05-12-12-48.png
Also, I found the sizing chart to be incorrect for me. This is a size 8 but according to my measurements I should have been a size 12. I had the same trouble with the skirt. Maybe it is the shape of my body that is throwing the chart off. I am a petite (short).
Screenshot2011-05-12at6.32.04PM-2011-05-12-12-48.png
I plan to make a few more of these! Maybe a portfolio dress in each color but no more plaid for me. :)
I hope you are having a great week! By the way mark your calendars for our May Giveaway, starting May 23!!!
May’s giveaway is sponsored by Sew Love Fabrics! I am so excited!!!
Happy Sewing!
Screenshot2011-04-22at8.21.20PM-2011-05-12-12-48.png

Comments

celkalee said…
Oh my gosh. That dress is absolutely wonderful. You did so well matching the plaid! Very preppy sort of look, I am not surprised the designer has such a fabulous resume. Really cute.
Lynne in NC said…
Leah,
You look so happy in your new dress. Great job on matching the plaid.
Thanks for the photos and the pattern review, too.
Ginger said…
Your dress looks so cute! Trust me, no one will notice the sewing "things" (and I use that word in a good way) except you. And in a few days you probably won't notice them either.

I've all but quit relining on the sizing on the back of the Big 4 patterns. I mostly look at the finished measurements or measure the pattern pieces of critical areas. Pre-kid I had this down and knew exactly how much ease I liked. Post-kid, not so much. But I think that is because I do not have the body I am used to.
Hi, Leah! I featured your gorgeous dress today :)

http://www.gwennypenny.com/2011/05/portfolio-dress-features.html
chris said…
Just popping in to say thank you for joining in the sew-along. Your dress looks so lovely. Featured on my blog today:
http://pickupsomecreativity.blogspot.com/2011/05/your-portfolio-dresses.html
Simone de Klerk said…
I saw your dress on Gwen's blog. Absolutely beautiful!!! Looks very sixties to me.

Popular posts from this blog

Fun in the Sun Mermaid Tutorial

Sewing Materials: 1/4 yard of Lycra or  5T or larger old swimsuit Thread Stretch Needle (helps) Sewing Machine and Sewing Notions Print the PDF patterns pieces out and tape them together. ✄✄✄✄✄✄✄✄✄✄✄ ✄✄✄✄ ✄✄ Step 1: Cutting Layout-  Place the templates over the fabric and cut. ✄✄✄✄✄✄✄✄✄✄✄ ✄✄✄✄ ✄✄ Step 2:   Fold the top edges of the mermaid tail and sew across. ✄✄✄✄✄✄✄✄✄✄✄ ✄✄✄✄ ✄✄ Step 3: Place the mermaid tale pieces right sides together. Sew around the mermaid tail using the stretch stitch, it looks like a bolt of lighting. ✄✄✄✄✄✄✄✄✄✄✄ ✄✄✄✄ ✄✄ Step 4: Flip the mermaid tail right side out using a chopstick.   Option: You can add Poly-fil to make the end of the tale puffy.   Set aside. ✄✄✄✄✄✄✄✄✄✄✄ ✄✄✄✄ ✄✄ Bodice   Step 1: Cut a bodice measuring  4.5” X1.5” or use template. ✄✄✄✄✄✄✄✄✄✄✄ ✄✄✄✄ ✄✄ Step 2: Fold the bodice right sides together and sew the  short ends making a loop. Use the edge of the presser foot for your seam a

How to Line an A-Line Skirt Tutorial

 After you find an A-line skirt pattern , I am using  One Yard Wonders 101  template . Make a muslin of your skirt! It only takes a few minutes to make a muslin version. Just baste stitch the side seams and make adjustments for your hips. Once your template is right you can make all the skirts your heart desires, so it is important to get the perfect fit first. Now we are ready to cut the "good" fabric and sew! ---------------------------------- ---------------------------------- ---------------------------------- ---------------------------------- Flip the skirt right side out and put it on!! You are done!! It is super easy and your new skirt will look store made.  Plus there is no hand stitching the lining to the main fabric. If you have any questions please comment below or email me at leah.sewspoiled@gmail.com .  WooHooo!! A-Line Skirt Pattern Finds

Sweet Coin Purse Tutorial for Teacher Gifts

This time of year is so special to me because I get to show my gratitude for all of the hard work that goes into teaching my daughters. I love to make handmade gifts and this year is no exception. Since money does not grow on trees around here, I looked at my stash (I keep my scraps in hat boxes ) and tried to see what I had a lot of; small zippers, trims, Peltex strips ( from making iPad cases ), fabric scraps and some hardware for key fobs. So I set to work.  Materials: Plastic multipurpose 5" Zipper  Fabric Scraps Lightweight interfacing 808 Pellon Trims (We clipped  key fobs  with 1.5" swivel hooks onto our coin purses . There are tons of tutorials on making key fobs .) Step 1: Print out the Coin Purse Template  PDF.  Cut 2 main fabric, cut 2 lining and 2 interfacing using the template.  Optional: Cut a 2"X2" square of your choice main fabric or lining. This strip of fabric is used to clip a key fob to your coin purse later. We used a 1.5