
Embroidery Help; Lesson 2- Set Up

Let's embroider a project!
             
                                  Wait a minute, wait a minute! Let's set up everything first.
Untitled
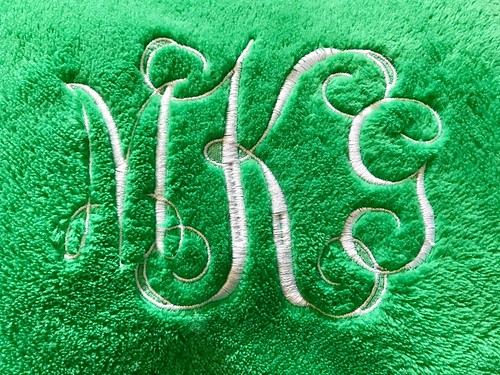
  • Set up the design for the embroidery machine. You will need to get your design ready for your machine. I use Embrilliance Software to move letters or move design pieces around and size things. I like to center everything in the hoop graph on my computer software so that it will transfer that to the machine. I also baste all of my designs. If you do not have the software you can use stitches directly from your embroidery machine, you can purchase files online and transfer them to your machine via SD card, USB or with a cable. 
  • Hoop the stabilizer, leave a little excess around the hoop. Make sure the stabilizer has a little tension like a drum. I do not hoop my fabric or project. I baste the project down first and then my machine runs the embroidery files. That way if the baste stitch is the wrong size or if the design is not center I can start over, change the size or take out the stitches and move the fabric. You can get hoop burn if you hoop your project fabric. 
  • Mark the project with a Target Stickers or I like to iron a mark where I want the embroidery to go on my project. (I will show you how later.) You will notice that there are marks on the hoop; north, south, east, and west or your X and Y axis. Your needle should be in the center of your hoop. These markings will help you adjust your work so it is centered. Some machines even come with a plastic grid that you can lay over the hooped project to help with centering. 

  • Let the machine show you how large the area it is embroidering. This can also help you see if a design is centered.

  • For fluffy designs, you will need a top stabilizer. 
  • Lower the presser foot and start the design.
  • If the machine skips over and goes across the hoop to a new area to embroider pause the machine and clip the thread.
  • When the project is done embroidering. Release the hoop, take out the basting stitches, clip any excess threads and trim or tear away the stabilizer. 
Untitled

Comments

A great lesson and really very helpful for embroidery users. Thank you very much for sharing
Julia Robert said…
This comment has been removed by the author.

Popular posts from this blog

Sweet Coin Purse Tutorial for Teacher Gifts

This time of year is so special to me because I get to show my gratitude for all of the hard work that goes into teaching my daughters. I love to make handmade gifts and this year is no exception. Since money does not grow on trees around here, I looked at my stash (I keep my scraps in hat boxes ) and tried to see what I had a lot of; small zippers, trims, Peltex strips ( from making iPad cases ), fabric scraps and some hardware for key fobs. So I set to work.  Materials: Plastic multipurpose 5" Zipper  Fabric Scraps Lightweight interfacing 808 Pellon Trims (We clipped  key fobs  with 1.5" swivel hooks onto our coin purses . There are tons of tutorials on making key fobs .) Step 1: Print out the Coin Purse Template  PDF.  Cut 2 main fabric, cut 2 lining and 2 interfacing using the template.  Optional: Cut a 2"X2" square of your choice main fabric or lining. This strip of fabric is used to clip a key fob to your coin purse later....

Fun in the Sun Mermaid Tutorial

Sewing Materials: 1/4 yard of Lycra or  5T or larger old swimsuit Thread Stretch Needle (helps) Sewing Machine and Sewing Notions Print the PDF patterns pieces out and tape them together. ✄✄✄✄✄✄✄✄✄✄✄ ✄✄✄✄ ✄✄ Step 1: Cutting Layout-  Place the templates over the fabric and cut. ✄✄✄✄✄✄✄✄✄✄✄ ✄✄✄✄ ✄✄ Step 2:   Fold the top edges of the mermaid tail and sew across. ✄✄✄✄✄✄✄✄✄✄✄ ✄✄✄✄ ✄✄ Step 3: Place the mermaid tale pieces right sides together. Sew around the mermaid tail using the stretch stitch, it looks like a bolt of lighting. ✄✄✄✄✄✄✄✄✄✄✄ ✄✄✄✄ ✄✄ Step 4: Flip the mermaid tail right side out using a chopstick.   Option: You can add Poly-fil to make the end of the tale puffy.   Set aside. ✄✄✄✄✄✄✄✄✄✄✄ ✄✄✄✄ ✄✄ Bodice   Step 1: Cut a bodice measuring  4.5” X1.5” or use template. ✄✄✄✄✄✄✄✄✄✄✄ ✄✄✄✄ ✄✄ Step 2: Fold the bodice right sides together and sew the  short ends making a loop. Use the e...

May 2011 Giveaway!

Thank you Sew Mama Sew for making today, May 23, 2011 Giveaway Day! Sew Love Fabrics will be sponsoring this month’s giveaway with eight fat quarters (18”X 22”) of Prince Charming prints in olive green, equaling 2 yards of gorgeous fabrics! If you would like to read more about Ruth, founder of Sew Love Fabrics , read her interview . Thank you so much for sharing your love of fabric with us! These are the fat quarters ready to ship to the lucky winner!! Giveaway Rules! +Our Giveaway will run May 23-27, 2011, with the winner being announced May 28, 2011! +The winner will be selected by Random.org +The package will be shipped to the winner by May 30, 2011. + To enter to win post a comment on this blog post! +Only one comment please per person. +This giveaway is open to everyone. +Leave your EMAIL ADDRESS, you can leave it as: leah(dot)sewspoiled(at)gamil(dot)com +This giveaway ends May 27, 2011 at 8PM Eastern Standard Time Thank you Ruth for sponsoring our May giveaway from Sew Love ...