
Shirred V-neck Top Tutorial

step8-2010-08-3-04-00.jpg

I am a t-shirt and jeans type of girl! If you are too, you might enjoy this simple tutorial. All you need is a V-neck shirt, a scrap piece of fabric, matching thread, and elastic thread for shirring.

Step1-2010-08-3-04-00.jpg
Step 1: Find a V-Neck t-shirt and a fun piece of fabric twice the width of the opening you will want to cover and approximately 5” h.

step2-2010-08-3-04-00.jpgstep3-2010-08-3-04-00.jpg
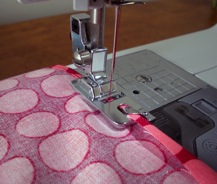
Step 2: Finish the two long sides of the scrap fabric. I used my new Hem Foot. It is a new tool for me and I am needing more practice with it. :) If you do not have a hem foot you can roll over the longest raw edge twice, iron and edge stitch.

step4-2010-08-3-04-00.jpg
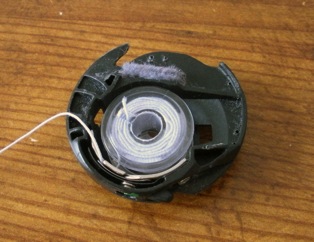
Step 3: Wind your elastic bobbin thread by hand.
In my case because I have a brother machine, take the casing out and thread bobbin thread into casing. Wind the elastic through until you hear a click.

step5-2010-08-3-04-00.jpgstep5a-2010-08-3-04-00.jpg
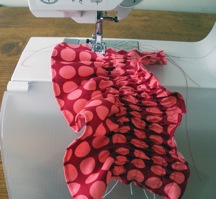
Step 4: With my machine set to it’s longest stitch, shirr 9-10 rows.

step6b-2010-08-3-04-00.jpg
Step 5: Cut the shirred fabric piece to fit your t-shirt, adding just enough to fold over the side raw edges. Iron and sew over 3 times on each side to secure the “V” side elastic edges.

step6-2010-08-3-04-00.jpgstep7-2010-08-3-04-00.jpg
Step 6: Pin the shirred fabric to your v-neck t-shirt. Sew around your t-shirt, try to stay on the t-shirt’s original topstitch.
Congratulations! Your done!!!
Now you have another fun way to add your favorite fabrics to your wardrobe. This project idea would look awesome with a skirt to match! Or try it on a kid size v-neck top to match a pair of cute handmade shorts or pants!
step8-2010-08-3-04-00.jpg
If you make a Shirred V-neck top, post your creation to your Sew Spoiled Projects! It is a flickr group set up for Sew Spoiled blog readers who make projects from Sew Spoiled Tutorials and Patterns. Simply join the group and add your pictures! I will post pictures from the group to show off your work.
Happy Sewing!
6429E12C38E1D1A63D84EB0D937554A4-2010-08-3-04-00.png

Comments

Anonymous said…
Just a quick note to let you know that a link to this post will be placed on CraftCrave today [03 Aug 12:00pm GMT]. Thanks, Maria
Lynne in NC said…
Awesome tute! Thanks for sharing. Now I can buy those 'revealing' tops and stylishly modify them for me and my daughter.
Peace.
Cute!
Thanks for linking up!
~Liz

Popular posts from this blog

Sweet Coin Purse Tutorial for Teacher Gifts

This time of year is so special to me because I get to show my gratitude for all of the hard work that goes into teaching my daughters. I love to make handmade gifts and this year is no exception. Since money does not grow on trees around here, I looked at my stash (I keep my scraps in hat boxes ) and tried to see what I had a lot of; small zippers, trims, Peltex strips ( from making iPad cases ), fabric scraps and some hardware for key fobs. So I set to work.  Materials: Plastic multipurpose 5" Zipper  Fabric Scraps Lightweight interfacing 808 Pellon Trims (We clipped  key fobs  with 1.5" swivel hooks onto our coin purses . There are tons of tutorials on making key fobs .) Step 1: Print out the Coin Purse Template  PDF.  Cut 2 main fabric, cut 2 lining and 2 interfacing using the template.  Optional: Cut a 2"X2" square of your choice main fabric or lining. This strip of fabric is used to clip a key fob to your coin purse later....

May 2011 Giveaway!

Thank you Sew Mama Sew for making today, May 23, 2011 Giveaway Day! Sew Love Fabrics will be sponsoring this month’s giveaway with eight fat quarters (18”X 22”) of Prince Charming prints in olive green, equaling 2 yards of gorgeous fabrics! If you would like to read more about Ruth, founder of Sew Love Fabrics , read her interview . Thank you so much for sharing your love of fabric with us! These are the fat quarters ready to ship to the lucky winner!! Giveaway Rules! +Our Giveaway will run May 23-27, 2011, with the winner being announced May 28, 2011! +The winner will be selected by Random.org +The package will be shipped to the winner by May 30, 2011. + To enter to win post a comment on this blog post! +Only one comment please per person. +This giveaway is open to everyone. +Leave your EMAIL ADDRESS, you can leave it as: leah(dot)sewspoiled(at)gamil(dot)com +This giveaway ends May 27, 2011 at 8PM Eastern Standard Time Thank you Ruth for sponsoring our May giveaway from Sew Love ...

Veruca Salt Dress

Every year we perform a musical and one of the highlights for me as a theater mom and seamstress is I get to make costumes! I love sewing and when I can sew for a show or for a music reason it is awesome! This year was Willy Wonka and the Chocolate Factory and I was able to recreate Veruca's red dress. The first step is to find a sewing pattern that I can manipulate to look like what the character needs.  I wanted to make the dress out of Pont de Roma fabric so it moved with the actress. Then I remembered the  Marianne Dress by Christine Haynes , it is perfect because it also had a peter pan collar. The peter pan collar did have some issues. I did not want a t-shirt binding. Also, the back of the collar did not have a collar. I drafted a back collar piece and since the opening was not stretchy, I created a keyhole with a button and loop closure. I lengthened the sleeves and used the cuffs from the pattern for long sleeves. Next, we added the buttons! We al...