
Cabrio Tote Sew Along Update Closed

Wow! Now we have 20 members in the Sew Along. I love this stage of the sew along. Everyone is making a plan to carry through. You have to start visualizing what the bag will look like finished. Where to place all of the prints you have gathered. Thank you for sharing your photos at Flickr: Sew Spoiled Cabrio Tote Sew Along. We are starting the cutting stage this week. Now that we have gathered our fabrics the sew along will start to move faster. Please remember to post pictures of your progress.
Screenshot2011-02-01at10.01.27PM-2011-02-1-22-00.png
I adore pink and green together. She has a wonderful plan.
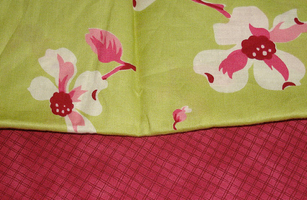
ā€œThe top green fabric will be the lower part of the outer shell. The pink will be the upper band on the outer shell. The next green will be for pockets. Finally, the cream and pink will be the interior.ā€
Screenshot2011-02-01at10.05.03PM-2011-02-1-22-00.png
I canā€™t wait to see more!
ā€œThe brown is a corduroy for the top panel, bottom and straps, the flora is Lori Siebertā€™s, ā€œBeauty in Nature" will be the main body and the orange and white for the lining. I eliminated the solid orange unless I decide to use it for the pockets undecided....ā€
Screenshot2011-02-01at10.06.25PM-2011-02-1-22-00.png
I love this purple floral print!
ā€œThe purple floral fabric is the main fabric. ā€ØTop & Handles: bright blue and the lining will be the light blue.ā€
Screenshot2011-02-01at10.08.42PM-2011-02-1-22-00.png
These fabrics look fun! I love the black and white print.
Screenshot2011-02-01at10.10.32PM-2011-02-1-22-00.png
Gorgeous fabrics!
Thank you ladies for posting these pictures. It is still not too late to join in on all of the fun! We have 6 days to cut out the cabrio tote!
Happy Sewing!
6429E12C38E1D1A63D84EB0D937554A4-2011-02-1-22-00.png

Comments

Popular posts from this blog

Sweet Coin Purse Tutorial for Teacher Gifts

This time of year is so special to me because I get to show my gratitude for all of the hard work that goes into teaching my daughters. I love to make handmade gifts and this year is no exception. Since money does not grow on trees around here, I looked at my stash (I keep my scraps in hat boxes ) and tried to see what I had a lot of; small zippers, trims, Peltex strips ( from making iPad cases ), fabric scraps and some hardware for key fobs. So I set to work.  Materials: Plastic multipurpose 5" Zipper  Fabric Scraps Lightweight interfacing 808 Pellon Trims (We clipped  key fobs  with 1.5" swivel hooks onto our coin purses . There are tons of tutorials on making key fobs .) Step 1: Print out the Coin Purse Template  PDF.  Cut 2 main fabric, cut 2 lining and 2 interfacing using the template.  Optional: Cut a 2"X2" square of your choice main fabric or lining. This strip of fabric is used to clip a key fob to your coin purse later....

Fun in the Sun Mermaid Tutorial

Sewing Materials: 1/4 yard of Lycra or  5T or larger old swimsuit Thread Stretch Needle (helps) Sewing Machine and Sewing Notions Print the PDF patterns pieces out and tape them together. āœ„āœ„āœ„āœ„āœ„āœ„āœ„āœ„āœ„āœ„āœ„ āœ„āœ„āœ„āœ„ āœ„āœ„ Step 1: Cutting Layout-  Place the templates over the fabric and cut. āœ„āœ„āœ„āœ„āœ„āœ„āœ„āœ„āœ„āœ„āœ„ āœ„āœ„āœ„āœ„ āœ„āœ„ Step 2:   Fold the top edges of the mermaid tail and sew across. āœ„āœ„āœ„āœ„āœ„āœ„āœ„āœ„āœ„āœ„āœ„ āœ„āœ„āœ„āœ„ āœ„āœ„ Step 3: Place the mermaid tale pieces right sides together. Sew around the mermaid tail using the stretch stitch, it looks like a bolt of lighting. āœ„āœ„āœ„āœ„āœ„āœ„āœ„āœ„āœ„āœ„āœ„ āœ„āœ„āœ„āœ„ āœ„āœ„ Step 4: Flip the mermaid tail right side out using a chopstick.   Option: You can add Poly-fil to make the end of the tale puffy.   Set aside. āœ„āœ„āœ„āœ„āœ„āœ„āœ„āœ„āœ„āœ„āœ„ āœ„āœ„āœ„āœ„ āœ„āœ„ Bodice   Step 1: Cut a bodice measuring  4.5ā€ X1.5ā€ or use template. āœ„āœ„āœ„āœ„āœ„āœ„āœ„āœ„āœ„āœ„āœ„ āœ„āœ„āœ„āœ„ āœ„āœ„ Step 2: Fold the bodice right sides together and sew the  short ends making a loop. Use the e...

Cute as a Button Bookmark Tutorial

These are called Cute as a Button Bookmakers. They are cheap, easy to make and are wonderful gifts!  All you need is  Bookmarkers/ PaperClips Size 45 or 1 1/8" Button Covers and kit Glue Gun Pliers (which you won't need if you get the flat back buttons). Step 1: Make a few fabric covered buttons.  These are size 45 or 1 1/8" buttons. Step 2: If you use normal buttons you will need to take the loops off to make them flat. However you can buy flat back buttons and not have to worry about the loop. Step 3: Add a dab of hot glue to the top of the large paperclip pad and place your fabric button on top of the glue. Step 4: Let it cool and it's ready to use! Happy Crafting!