
Embroider Your Own Stockings Tutorial, Part 2

step6allsetup-2010-11-30-05-30.jpg
So we left here at this point yesterday with Part 1 tutorial showing us how to set up your machine. Today we will embroider the stockings.
āœ„āœ„āœ„āœ„āœ„āœ„āœ„āœ„āœ„āœ„āœ„āœ„āœ„āœ„āœ„āœ„āœ„āœ„āœ„āœ„āœ„
Make sure you have loaded on your embroidery machine the letters you need for your familyā€™s names.
Some machines have built in fonts.
āœ„āœ„āœ„āœ„āœ„āœ„āœ„āœ„āœ„āœ„āœ„āœ„āœ„āœ„āœ„āœ„āœ„āœ„āœ„āœ„āœ„
2010-11-29_20-15-03-2010-11-30-05-30.jpg
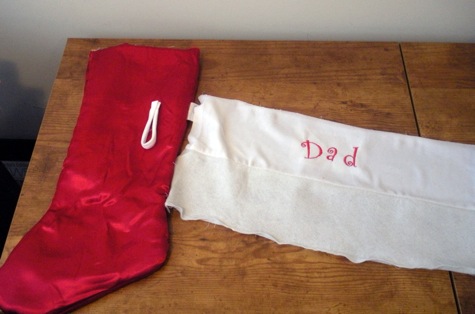
Step 1: Mark the center of the stocking cuff with a water soluble pen.
The first stocking I embroidered, I drew an arrow so I did not forget the correct direction of the cuff for my letters.
āœ„āœ„āœ„āœ„āœ„āœ„āœ„āœ„āœ„āœ„āœ„āœ„āœ„āœ„āœ„āœ„āœ„āœ„āœ„āœ„āœ„
2010-11-29_20-50-40-2010-11-30-05-30.jpg
Step 2: With the seam ripper take the cuff off of the stocking.
step9cuffoff-2010-11-30-05-30.jpg
āœ„āœ„āœ„āœ„āœ„āœ„āœ„āœ„āœ„āœ„āœ„āœ„āœ„āœ„āœ„āœ„āœ„āœ„āœ„āœ„āœ„
step10aopeningcuff-2010-11-30-05-30.jpg
Step 3: The cuff is a large loop, with the seam ripper open up the loop. Now it will lay flat under the embroidery machine.
2010-11-29_20-38-31-2010-11-30-05-30.jpg
āœ„āœ„āœ„āœ„āœ„āœ„āœ„āœ„āœ„āœ„āœ„āœ„āœ„āœ„āœ„āœ„āœ„āœ„āœ„āœ„āœ„
Step11-2010-11-30-05-30.jpg
Step 4: Place the white cuff fabric over the interfacing in your hoop. Make sure the water soluble mark is under your embroidery foot. Use the free basting stitches at Swak Embroidery to secure the fabric to the interfacing in the hoop or spray adhesive to stick the fabric to the interfacing.
āœ„āœ„āœ„āœ„āœ„āœ„āœ„āœ„āœ„āœ„āœ„āœ„āœ„āœ„āœ„āœ„āœ„āœ„āœ„āœ„āœ„
Step12letters-2010-11-30-05-30.jpg
Step 5: If your letters are all together and you can program your machine to stitch them at the same time, look over this step. If you downloaded the Curls Font to your machine and each letter is a separate design. Start with the middle letter of the name and work outwards.
I am spelling Dad here, so I started with ā€œaā€.
āœ„āœ„āœ„āœ„āœ„āœ„āœ„āœ„āœ„āœ„āœ„āœ„āœ„āœ„āœ„āœ„āœ„āœ„āœ„āœ„āœ„
Step12b-2010-11-30-05-30.jpg
Step 6: Finish your design on the cuff and take it off the hoop
Step13unhoop-2010-11-30-05-30.jpg
āœ„āœ„āœ„āœ„āœ„āœ„āœ„āœ„āœ„āœ„āœ„āœ„āœ„āœ„āœ„āœ„āœ„āœ„āœ„āœ„āœ„
step14sewthecufftogether-2010-11-30-05-30.jpg
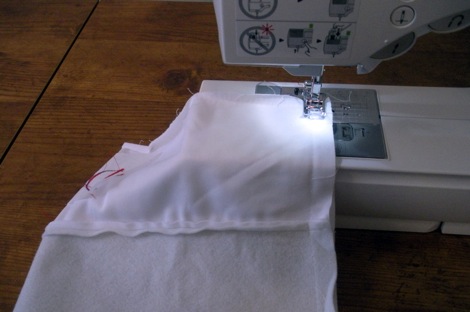
Step 7: Sew the cuff back into a loop again. Follow the old seam line.
āœ„āœ„āœ„āœ„āœ„āœ„āœ„āœ„āœ„āœ„āœ„āœ„āœ„āœ„āœ„āœ„āœ„āœ„āœ„āœ„āœ„
2010-11-29_20-56-43-2010-11-30-05-30.jpg
Step 8: Pin together the stocking lining side out, the cuff wrong side out with the loop sandwiched in between. Sew around the cuff. Flip the stocking right side out and hang by the fireplace!
Step14bsewtotopunhoop-2010-11-30-05-30.jpg
āœ„āœ„āœ„āœ„āœ„āœ„āœ„āœ„āœ„āœ„āœ„āœ„āœ„āœ„āœ„āœ„āœ„āœ„āœ„āœ„āœ„
stockings-2010-11-30-05-30.jpg
I hope you give this a try. If you embroider your stocking this holiday season using this tutorial please add your photos to the Your Sew Spoiled Projects Flickr group!
Happy Embroidering!
6429E12C38E1D1A63D84EB0D937554A4-2010-11-30-05-30.png

Comments

palsoftwares1 saidā€¦
Nice information, valuable and excellent design, as share good stuff with good ideas and concepts, lots of great information and inspiration, both of which we all need, thanks for all the enthusiasm to offer such helpful information here.
BryeLynn saidā€¦
Great tutorial! Thank you sew much. I will try this on my next stockings
Anonymous saidā€¦
This is nice! I would love to make some personalized stockings for Christmas!
oak dining room tables
This tutorial on digitizing of your own stockings.. is just awesome. Thanks a lot for it.

Popular posts from this blog

Sweet Coin Purse Tutorial for Teacher Gifts

This time of year is so special to me because I get to show my gratitude for all of the hard work that goes into teaching my daughters. I love to make handmade gifts and this year is no exception. Since money does not grow on trees around here, I looked at my stash (I keep my scraps in hat boxes ) and tried to see what I had a lot of; small zippers, trims, Peltex strips ( from making iPad cases ), fabric scraps and some hardware for key fobs. So I set to work.  Materials: Plastic multipurpose 5" Zipper  Fabric Scraps Lightweight interfacing 808 Pellon Trims (We clipped  key fobs  with 1.5" swivel hooks onto our coin purses . There are tons of tutorials on making key fobs .) Step 1: Print out the Coin Purse Template  PDF.  Cut 2 main fabric, cut 2 lining and 2 interfacing using the template.  Optional: Cut a 2"X2" square of your choice main fabric or lining. This strip of fabric is used to clip a key fob to your coin purse later....

Fun in the Sun Mermaid Tutorial

Sewing Materials: 1/4 yard of Lycra or  5T or larger old swimsuit Thread Stretch Needle (helps) Sewing Machine and Sewing Notions Print the PDF patterns pieces out and tape them together. āœ„āœ„āœ„āœ„āœ„āœ„āœ„āœ„āœ„āœ„āœ„ āœ„āœ„āœ„āœ„ āœ„āœ„ Step 1: Cutting Layout-  Place the templates over the fabric and cut. āœ„āœ„āœ„āœ„āœ„āœ„āœ„āœ„āœ„āœ„āœ„ āœ„āœ„āœ„āœ„ āœ„āœ„ Step 2:   Fold the top edges of the mermaid tail and sew across. āœ„āœ„āœ„āœ„āœ„āœ„āœ„āœ„āœ„āœ„āœ„ āœ„āœ„āœ„āœ„ āœ„āœ„ Step 3: Place the mermaid tale pieces right sides together. Sew around the mermaid tail using the stretch stitch, it looks like a bolt of lighting. āœ„āœ„āœ„āœ„āœ„āœ„āœ„āœ„āœ„āœ„āœ„ āœ„āœ„āœ„āœ„ āœ„āœ„ Step 4: Flip the mermaid tail right side out using a chopstick.   Option: You can add Poly-fil to make the end of the tale puffy.   Set aside. āœ„āœ„āœ„āœ„āœ„āœ„āœ„āœ„āœ„āœ„āœ„ āœ„āœ„āœ„āœ„ āœ„āœ„ Bodice   Step 1: Cut a bodice measuring  4.5ā€ X1.5ā€ or use template. āœ„āœ„āœ„āœ„āœ„āœ„āœ„āœ„āœ„āœ„āœ„ āœ„āœ„āœ„āœ„ āœ„āœ„ Step 2: Fold the bodice right sides together and sew the  short ends making a loop. Use the e...

Cute as a Button Bookmark Tutorial

These are called Cute as a Button Bookmakers. They are cheap, easy to make and are wonderful gifts!  All you need is  Bookmarkers/ PaperClips Size 45 or 1 1/8" Button Covers and kit Glue Gun Pliers (which you won't need if you get the flat back buttons). Step 1: Make a few fabric covered buttons.  These are size 45 or 1 1/8" buttons. Step 2: If you use normal buttons you will need to take the loops off to make them flat. However you can buy flat back buttons and not have to worry about the loop. Step 3: Add a dab of hot glue to the top of the large paperclip pad and place your fabric button on top of the glue. Step 4: Let it cool and it's ready to use! Happy Crafting!