
Shirred Knit Scarf Tutorial!

emmy-scarf-3-2010-11-7-17-30.jpg
This shirred scarf tutorial is for little ones! I would make these for kids between the ages of 3-teen. If you are an adult and would like to make one for yourself or for an older teenager double the length by sewing two 54ā€X 7ā€ panels together and then follow the directions through to the end.
Finished shirred scarf for kids measures approximately 30ā€X 7ā€ and adults measures approximately 50ā€X 7ā€.
fiinished-2010-11-7-17-30.jpg
Materials:
1/4 yard for kids or 1/2 yard for adults of Knit Fabric.
Elastic Thread
step-1-2010-11-7-17-30.jpg
Step 1:
Wash your fabric, the knit fabric will shrink.
Cut the knit fabric across the width, measuring approximately 54ā€ X 7ā€.
step-2a-2010-11-7-17-30.jpg
Step 2:
Serge the 54ā€ sides of the fabric strip. (Due to the knit fabric you could forgo this step, especially if you do not own a serger.)
Screenshot2010-11-07at3.13.16PM-2010-11-7-17-30.png
Step 3:
Prepare the sewing machine for shirring. Wind the bobbin by hand with elastic thread, check the tension of your machine and thread the upper thread of the machine normally. (Test on a scrap piece of fabric.) If you have a brother machine go here for some extra tips!
step-4a1-2010-11-7-17-30.jpgstep-4a2-2010-11-7-17-30.jpg
Step 4:
Shirr the scarf 2ā€ from the serged edge along both sides. (I used the metal plate on my sewing machine as a guide.)
step-4b-2010-11-7-17-30.jpgstep-4c-2010-11-7-17-30.jpg
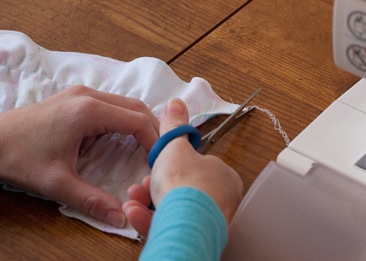
Then shirr once more down the middle, between the first two shirred lines. This will create the gathered ruffle look! Trim the excess threads.
step-5a-2010-11-7-17-30.jpgstep-5b-2010-11-7-17-30.jpg
Step 5:
Take out the elastic bobbin and set up the sewing machine to sew normally.
Roll over the short 7ā€ ends twice, pin in place and sew. (I like to sew repeatedly over the shirred lines to make sure the elastic thread stays in place.)
Girls-1-2010-11-7-17-30.jpg
You are all done!!! Shirred Scarves will make great quick and easy gifts for the holiday season!
If your little one has a special friend to buy a gift for this holiday season give them a cute shirred scarf!
--------------------------------------------------------------
If you make a Shirred Scarf, post your creation to your Sew Spoiled Projects! It is a flickr group set up for Sew Spoiled blog readers who make projects from Sew Spoiled Tutorials and Patterns. Simply join the group and add your pictures! I will post pictures from the group to show off your work.
Happy Sewing!
6429E12C38E1D1A63D84EB0D937554A4-2010-08-3-04-00-2010-11-7-17-30.png

Comments

Twins Squared saidā€¦
Cute idea! Thanks for the tutorial.
Mychel saidā€¦
Those are awesome!Gotta make me some :D

Popular posts from this blog

Sweet Coin Purse Tutorial for Teacher Gifts

This time of year is so special to me because I get to show my gratitude for all of the hard work that goes into teaching my daughters. I love to make handmade gifts and this year is no exception. Since money does not grow on trees around here, I looked at my stash (I keep my scraps in hat boxes ) and tried to see what I had a lot of; small zippers, trims, Peltex strips ( from making iPad cases ), fabric scraps and some hardware for key fobs. So I set to work.  Materials: Plastic multipurpose 5" Zipper  Fabric Scraps Lightweight interfacing 808 Pellon Trims (We clipped  key fobs  with 1.5" swivel hooks onto our coin purses . There are tons of tutorials on making key fobs .) Step 1: Print out the Coin Purse Template  PDF.  Cut 2 main fabric, cut 2 lining and 2 interfacing using the template.  Optional: Cut a 2"X2" square of your choice main fabric or lining. This strip of fabric is used to clip a key fob to your coin purse later....

Fun in the Sun Mermaid Tutorial

Sewing Materials: 1/4 yard of Lycra or  5T or larger old swimsuit Thread Stretch Needle (helps) Sewing Machine and Sewing Notions Print the PDF patterns pieces out and tape them together. āœ„āœ„āœ„āœ„āœ„āœ„āœ„āœ„āœ„āœ„āœ„ āœ„āœ„āœ„āœ„ āœ„āœ„ Step 1: Cutting Layout-  Place the templates over the fabric and cut. āœ„āœ„āœ„āœ„āœ„āœ„āœ„āœ„āœ„āœ„āœ„ āœ„āœ„āœ„āœ„ āœ„āœ„ Step 2:   Fold the top edges of the mermaid tail and sew across. āœ„āœ„āœ„āœ„āœ„āœ„āœ„āœ„āœ„āœ„āœ„ āœ„āœ„āœ„āœ„ āœ„āœ„ Step 3: Place the mermaid tale pieces right sides together. Sew around the mermaid tail using the stretch stitch, it looks like a bolt of lighting. āœ„āœ„āœ„āœ„āœ„āœ„āœ„āœ„āœ„āœ„āœ„ āœ„āœ„āœ„āœ„ āœ„āœ„ Step 4: Flip the mermaid tail right side out using a chopstick.   Option: You can add Poly-fil to make the end of the tale puffy.   Set aside. āœ„āœ„āœ„āœ„āœ„āœ„āœ„āœ„āœ„āœ„āœ„ āœ„āœ„āœ„āœ„ āœ„āœ„ Bodice   Step 1: Cut a bodice measuring  4.5ā€ X1.5ā€ or use template. āœ„āœ„āœ„āœ„āœ„āœ„āœ„āœ„āœ„āœ„āœ„ āœ„āœ„āœ„āœ„ āœ„āœ„ Step 2: Fold the bodice right sides together and sew the  short ends making a loop. Use the e...

Cute as a Button Bookmark Tutorial

These are called Cute as a Button Bookmakers. They are cheap, easy to make and are wonderful gifts!  All you need is  Bookmarkers/ PaperClips Size 45 or 1 1/8" Button Covers and kit Glue Gun Pliers (which you won't need if you get the flat back buttons). Step 1: Make a few fabric covered buttons.  These are size 45 or 1 1/8" buttons. Step 2: If you use normal buttons you will need to take the loops off to make them flat. However you can buy flat back buttons and not have to worry about the loop. Step 3: Add a dab of hot glue to the top of the large paperclip pad and place your fabric button on top of the glue. Step 4: Let it cool and it's ready to use! Happy Crafting!