
Weekend Sewing!

Sewing-Machine-Cover-2010-11-15-19-00.jpg
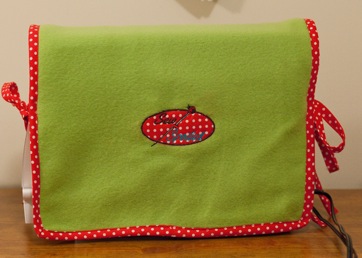
Here is one project I finished over the weekend. It was a spontaneous sewing adventure. It started by embroidering the fleece fabric with my Sew Spoiled Logo. Then I decided to use the embroidered fabric for a sewing machine cover cutting the fabric 25.5”X 15”. I embroidered the other side of the cover with the free“Believe” embroidery design from Swak embroidery. To tone down the green, I decided to bind the sides of the cover with red and make the ties with the same fabric.
I hope you had a great weekend!
Happy Sewing!

6429E12C38E1D1A63D84EB0D937554A4-2010-11-15-19-00.png

Comments

Elena said…
Great job! It turned out so cute!
Now I have an embroidery question: what software do you like to use? I want to start doing more, but the software is so pricey, I'm wary of taking the plunge. Know of any machine embroidery blogs out there?
Thanks! :)
Sew Spoiled said…
Hi Elena!
I have to admit I have not taken the plunge either on embroidery software because the price. I do have a few places I like to go for free/sold designs...
http://www.annthegran.com/
http://freeembroiderystuff.embroiderydesigns.com/
and Swak embroidery.
If anyone else has an embroidery software program you recommend or know of other helpful websites for embroidery designs please share!
I have heard of embroidery forums that help digitalize designs too. Share what you know!
~Leah
craftmates said…
I love this sewing machine cover!!!

Popular posts from this blog

Sweet Coin Purse Tutorial for Teacher Gifts

This time of year is so special to me because I get to show my gratitude for all of the hard work that goes into teaching my daughters. I love to make handmade gifts and this year is no exception. Since money does not grow on trees around here, I looked at my stash (I keep my scraps in hat boxes ) and tried to see what I had a lot of; small zippers, trims, Peltex strips ( from making iPad cases ), fabric scraps and some hardware for key fobs. So I set to work.  Materials: Plastic multipurpose 5" Zipper  Fabric Scraps Lightweight interfacing 808 Pellon Trims (We clipped  key fobs  with 1.5" swivel hooks onto our coin purses . There are tons of tutorials on making key fobs .) Step 1: Print out the Coin Purse Template  PDF.  Cut 2 main fabric, cut 2 lining and 2 interfacing using the template.  Optional: Cut a 2"X2" square of your choice main fabric or lining. This strip of fabric is used to clip a key fob to your coin purse later....

Veruca Salt Dress

Every year we perform a musical and one of the highlights for me as a theater mom and seamstress is I get to make costumes! I love sewing and when I can sew for a show or for a music reason it is awesome! This year was Willy Wonka and the Chocolate Factory and I was able to recreate Veruca's red dress. The first step is to find a sewing pattern that I can manipulate to look like what the character needs.  I wanted to make the dress out of Pont de Roma fabric so it moved with the actress. Then I remembered the  Marianne Dress by Christine Haynes , it is perfect because it also had a peter pan collar. The peter pan collar did have some issues. I did not want a t-shirt binding. Also, the back of the collar did not have a collar. I drafted a back collar piece and since the opening was not stretchy, I created a keyhole with a button and loop closure. I lengthened the sleeves and used the cuffs from the pattern for long sleeves. Next, we added the buttons! We al...

Fun in the Sun Mermaid Tutorial

Sewing Materials: 1/4 yard of Lycra or  5T or larger old swimsuit Thread Stretch Needle (helps) Sewing Machine and Sewing Notions Print the PDF patterns pieces out and tape them together. ✄✄✄✄✄✄✄✄✄✄✄ ✄✄✄✄ ✄✄ Step 1: Cutting Layout-  Place the templates over the fabric and cut. ✄✄✄✄✄✄✄✄✄✄✄ ✄✄✄✄ ✄✄ Step 2:   Fold the top edges of the mermaid tail and sew across. ✄✄✄✄✄✄✄✄✄✄✄ ✄✄✄✄ ✄✄ Step 3: Place the mermaid tale pieces right sides together. Sew around the mermaid tail using the stretch stitch, it looks like a bolt of lighting. ✄✄✄✄✄✄✄✄✄✄✄ ✄✄✄✄ ✄✄ Step 4: Flip the mermaid tail right side out using a chopstick.   Option: You can add Poly-fil to make the end of the tale puffy.   Set aside. ✄✄✄✄✄✄✄✄✄✄✄ ✄✄✄✄ ✄✄ Bodice   Step 1: Cut a bodice measuring  4.5” X1.5” or use template. ✄✄✄✄✄✄✄✄✄✄✄ ✄✄✄✄ ✄✄ Step 2: Fold the bodice right sides together and sew the  short ends making a loop. Use the e...