
Dear My Kids Stylish Coat Pattern

Screenshot2010-10-10at9.12.23AM-2010-10-10-09-11.png
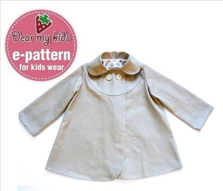
Well, I feel like I am a little behind with the Dear My Kids Peter Pan Collar Coat project because after I purchased the pattern this weekend, I found that last month there was a sew-along for this jacket at From the Igloo. At least now I can read about the whole process.
Day 1
Day 2
Day 3
Day 4
Coat-FAbric-2010-10-10-09-11.jpg
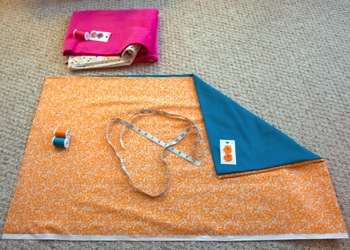
The corduroy will be for the outer shell and cotton will be for the lining. The blue is for my oldest (the penguin) and the pink is for my youngest (the princess). This coat looks perfect for the fall! The fair is in town, festivals are popping up everywhere and with all of the outside activities these coats will be wonderful in the cooler weather. This lazy Sunday afternoon sewing in my sewing room with the windows open to the fresh fall air sounds wonderful!
Happy Sewing!
Leah

Comments

Twins Squared said…
I participated in the From an Igloo Sew Along and completed one coat so far. I still need to make the second one. The explanation on From an Igloo really helped me a lot. I ended up making the size 8 for my big 5 year olds. The length of the coat is great. The sleeves are long but it is nice to roll them up anyway to see the lining. The only word of warning I would give is that the fit is a little tight in the chest and armhole area. Have fun making yours and I can't wait to see them.
http://twincess.blogspot.com/
pinkorchid said…
They are so cute...Do you have any idea how much of each fabric will I need to make a size kinda in between 2T-3T? also where do you guys get your fabrics from? I mean I'm not one who sews very frequently, but love to...so I can't bulk order. but the JoAnn near me does not carry such variant bright fabrics. Online ones have quite a lot for shipping :-(

Popular posts from this blog

Fun in the Sun Mermaid Tutorial

Sewing Materials: 1/4 yard of Lycra or  5T or larger old swimsuit Thread Stretch Needle (helps) Sewing Machine and Sewing Notions Print the PDF patterns pieces out and tape them together. ✄✄✄✄✄✄✄✄✄✄✄ ✄✄✄✄ ✄✄ Step 1: Cutting Layout-  Place the templates over the fabric and cut. ✄✄✄✄✄✄✄✄✄✄✄ ✄✄✄✄ ✄✄ Step 2:   Fold the top edges of the mermaid tail and sew across. ✄✄✄✄✄✄✄✄✄✄✄ ✄✄✄✄ ✄✄ Step 3: Place the mermaid tale pieces right sides together. Sew around the mermaid tail using the stretch stitch, it looks like a bolt of lighting. ✄✄✄✄✄✄✄✄✄✄✄ ✄✄✄✄ ✄✄ Step 4: Flip the mermaid tail right side out using a chopstick.   Option: You can add Poly-fil to make the end of the tale puffy.   Set aside. ✄✄✄✄✄✄✄✄✄✄✄ ✄✄✄✄ ✄✄ Bodice   Step 1: Cut a bodice measuring  4.5” X1.5” or use template. ✄✄✄✄✄✄✄✄✄✄✄ ✄✄✄✄ ✄✄ Step 2: Fold the bodice right sides together and sew the  short ends making a loop. Use the edge of the presser foot for your seam a

How to Line an A-Line Skirt Tutorial

 After you find an A-line skirt pattern , I am using  One Yard Wonders 101  template . Make a muslin of your skirt! It only takes a few minutes to make a muslin version. Just baste stitch the side seams and make adjustments for your hips. Once your template is right you can make all the skirts your heart desires, so it is important to get the perfect fit first. Now we are ready to cut the "good" fabric and sew! ---------------------------------- ---------------------------------- ---------------------------------- ---------------------------------- Flip the skirt right side out and put it on!! You are done!! It is super easy and your new skirt will look store made.  Plus there is no hand stitching the lining to the main fabric. If you have any questions please comment below or email me at leah.sewspoiled@gmail.com .  WooHooo!! A-Line Skirt Pattern Finds

Sweet Coin Purse Tutorial for Teacher Gifts

This time of year is so special to me because I get to show my gratitude for all of the hard work that goes into teaching my daughters. I love to make handmade gifts and this year is no exception. Since money does not grow on trees around here, I looked at my stash (I keep my scraps in hat boxes ) and tried to see what I had a lot of; small zippers, trims, Peltex strips ( from making iPad cases ), fabric scraps and some hardware for key fobs. So I set to work.  Materials: Plastic multipurpose 5" Zipper  Fabric Scraps Lightweight interfacing 808 Pellon Trims (We clipped  key fobs  with 1.5" swivel hooks onto our coin purses . There are tons of tutorials on making key fobs .) Step 1: Print out the Coin Purse Template  PDF.  Cut 2 main fabric, cut 2 lining and 2 interfacing using the template.  Optional: Cut a 2"X2" square of your choice main fabric or lining. This strip of fabric is used to clip a key fob to your coin purse later. We used a 1.5