
Cabrio Tote Sew Along: Finished!

I am so proud to say we are finished! Look at these amazing Cabrio Totes!!! 9 totes have been completed with more on the way! I will post the Sew Spoiled pattern winners this afternoon! Please continue to send all of your pictures to Flickr: Sew Spoiled Cabrio Tote Sew Along group. Let’s take a closer at these gorgeous bags!
Screenshot2011-03-06at7.45.21PM-2011-03-8-09-01.png
She made the shoulder strap adjustable!
āœ„āœ„āœ„āœ„āœ„āœ„āœ„āœ„āœ„āœ„āœ„āœ„āœ„āœ„āœ„āœ„āœ„āœ„āœ„āœ„āœ„āœ„āœ„āœ„āœ„āœ„āœ„āœ„āœ„āœ„āœ„āœ„āœ„āœ„āœ„āœ„āœ„āœ„
Screenshot2011-03-06at7.48.43PM-2011-03-8-09-01.png
Super cute and fun! You should check out her blog so simply Stephanie! Thank you for your beautiful pictures.
āœ„āœ„āœ„āœ„āœ„āœ„āœ„āœ„āœ„āœ„āœ„āœ„āœ„āœ„āœ„āœ„āœ„āœ„āœ„āœ„āœ„āœ„āœ„āœ„āœ„āœ„āœ„āœ„āœ„āœ„āœ„āœ„āœ„āœ„āœ„āœ„āœ„āœ„
Screenshot2011-03-06at7.50.25PM-2011-03-8-09-01.png
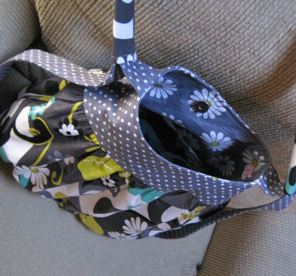
I love the lower fabric print!!!! Here is a link to her blog Kimminita.
āœ„āœ„āœ„āœ„āœ„āœ„āœ„āœ„āœ„āœ„āœ„āœ„āœ„āœ„āœ„āœ„āœ„āœ„āœ„āœ„āœ„āœ„āœ„āœ„āœ„āœ„āœ„āœ„āœ„āœ„āœ„āœ„āœ„āœ„āœ„āœ„āœ„āœ„
Screenshot2011-03-06at7.55.15PM-2011-03-8-09-01.png
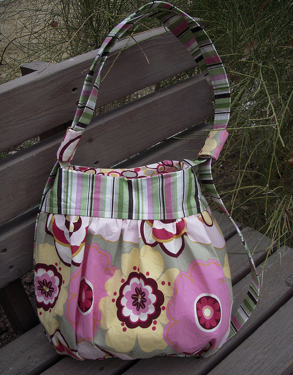
Kelly made this awesome Cabrio Tote. I love her blog em ay kay ee. — {Make} !!!
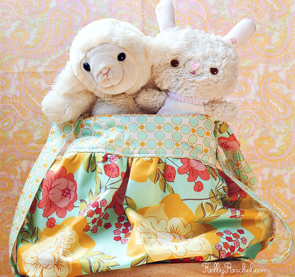
This is such a cute picture with the softies inside the tote!
āœ„āœ„āœ„āœ„āœ„āœ„āœ„āœ„āœ„āœ„āœ„āœ„āœ„āœ„āœ„āœ„āœ„āœ„āœ„āœ„āœ„āœ„āœ„āœ„āœ„āœ„āœ„āœ„āœ„āœ„āœ„āœ„āœ„āœ„āœ„āœ„āœ„āœ„
Screenshot2011-03-06at7.56.54PM-2011-03-8-09-01.png
Screenshot2011-03-06at7.58.35PM-2011-03-8-09-01.png
Wow! I love these colorful totes from Tjachetta! Thank you for sharing all of your pictures!
āœ„āœ„āœ„āœ„āœ„āœ„āœ„āœ„āœ„āœ„āœ„āœ„āœ„āœ„āœ„āœ„āœ„āœ„āœ„āœ„āœ„āœ„āœ„āœ„āœ„āœ„āœ„āœ„āœ„āœ„āœ„āœ„āœ„āœ„āœ„āœ„āœ„āœ„
Screenshot2011-03-07at9.55.11PM-2011-03-8-09-01.png
Great job! She also has a great blog called All IN STITCHES.
āœ„āœ„āœ„āœ„āœ„āœ„āœ„āœ„āœ„āœ„āœ„āœ„āœ„āœ„āœ„āœ„āœ„āœ„āœ„āœ„āœ„āœ„āœ„āœ„āœ„āœ„āœ„āœ„āœ„āœ„āœ„āœ„āœ„āœ„āœ„āœ„āœ„āœ„
Screenshot2011-03-07at9.56.01PM-2011-03-8-09-01.png
Look at this!!! I love the grey and bright colors in the main fabric. Thank you for sharing your pictures with us!
āœ„āœ„āœ„āœ„āœ„āœ„āœ„āœ„āœ„āœ„āœ„āœ„āœ„āœ„āœ„āœ„āœ„āœ„āœ„āœ„āœ„āœ„āœ„āœ„āœ„āœ„āœ„āœ„āœ„āœ„āœ„āœ„āœ„āœ„āœ„āœ„āœ„āœ„
Sewalong-a-2011-03-8-09-01.jpg
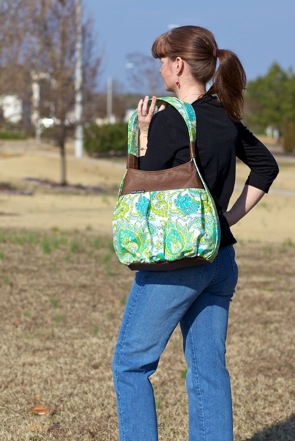
This is my Cabrio Tote! I love it! I made it with leather and Amy Butler fabrics from her Soul Blossom collection. If you have not added your pictures please do. The 5 Sew Spoiled pattern winners will be announce this evening for theses photos...

1.Most Inspiring,

2.Craziest Camera angle,

3.Loveliest Light,

4.Bag Making Magic,
and 
        
5."Oops, I meant to do That?".
Good Luck!
6429E12C38E1D1A63D84EB0D937554A4-2011-03-8-09-01.png

Comments

Kimminita said…
So much fun to see them all together! Thank you for hosting this great sew along.
Kelly Rachel said…
Yay! They are all so lovely. This was such a great pattern I'm thinking of making some up as gifts. Now that I've got the hang of it, I think I can do it a little faster.
I took mine out for the first time today, and was so proud to show it off. Thanks again Leah for an awesome sew-along.
Stephanie said…
I have received several compliments on my purse (the owls print). I JUST finished up the 2nd tote I'm making for a friend & posted the pics on flickr. I KNOW she is going to love it.

Thanks for doing this fun sew-along!

Popular posts from this blog

Sweet Coin Purse Tutorial for Teacher Gifts

This time of year is so special to me because I get to show my gratitude for all of the hard work that goes into teaching my daughters. I love to make handmade gifts and this year is no exception. Since money does not grow on trees around here, I looked at my stash (I keep my scraps in hat boxes ) and tried to see what I had a lot of; small zippers, trims, Peltex strips ( from making iPad cases ), fabric scraps and some hardware for key fobs. So I set to work.  Materials: Plastic multipurpose 5" Zipper  Fabric Scraps Lightweight interfacing 808 Pellon Trims (We clipped  key fobs  with 1.5" swivel hooks onto our coin purses . There are tons of tutorials on making key fobs .) Step 1: Print out the Coin Purse Template  PDF.  Cut 2 main fabric, cut 2 lining and 2 interfacing using the template.  Optional: Cut a 2"X2" square of your choice main fabric or lining. This strip of fabric is used to clip a key fob to your coin purse later....

Fun in the Sun Mermaid Tutorial

Sewing Materials: 1/4 yard of Lycra or  5T or larger old swimsuit Thread Stretch Needle (helps) Sewing Machine and Sewing Notions Print the PDF patterns pieces out and tape them together. āœ„āœ„āœ„āœ„āœ„āœ„āœ„āœ„āœ„āœ„āœ„ āœ„āœ„āœ„āœ„ āœ„āœ„ Step 1: Cutting Layout-  Place the templates over the fabric and cut. āœ„āœ„āœ„āœ„āœ„āœ„āœ„āœ„āœ„āœ„āœ„ āœ„āœ„āœ„āœ„ āœ„āœ„ Step 2:   Fold the top edges of the mermaid tail and sew across. āœ„āœ„āœ„āœ„āœ„āœ„āœ„āœ„āœ„āœ„āœ„ āœ„āœ„āœ„āœ„ āœ„āœ„ Step 3: Place the mermaid tale pieces right sides together. Sew around the mermaid tail using the stretch stitch, it looks like a bolt of lighting. āœ„āœ„āœ„āœ„āœ„āœ„āœ„āœ„āœ„āœ„āœ„ āœ„āœ„āœ„āœ„ āœ„āœ„ Step 4: Flip the mermaid tail right side out using a chopstick.   Option: You can add Poly-fil to make the end of the tale puffy.   Set aside. āœ„āœ„āœ„āœ„āœ„āœ„āœ„āœ„āœ„āœ„āœ„ āœ„āœ„āœ„āœ„ āœ„āœ„ Bodice   Step 1: Cut a bodice measuring  4.5ā€ X1.5ā€ or use template. āœ„āœ„āœ„āœ„āœ„āœ„āœ„āœ„āœ„āœ„āœ„ āœ„āœ„āœ„āœ„ āœ„āœ„ Step 2: Fold the bodice right sides together and sew the  short ends making a loop. Use the e...

Cute as a Button Bookmark Tutorial

These are called Cute as a Button Bookmakers. They are cheap, easy to make and are wonderful gifts!  All you need is  Bookmarkers/ PaperClips Size 45 or 1 1/8" Button Covers and kit Glue Gun Pliers (which you won't need if you get the flat back buttons). Step 1: Make a few fabric covered buttons.  These are size 45 or 1 1/8" buttons. Step 2: If you use normal buttons you will need to take the loops off to make them flat. However you can buy flat back buttons and not have to worry about the loop. Step 3: Add a dab of hot glue to the top of the large paperclip pad and place your fabric button on top of the glue. Step 4: Let it cool and it's ready to use! Happy Crafting!