
Cabrio Tote Sew Along: Outer shell

Wow! Everyone in the Sew Along is working hard on their beautiful Cabrio Totes! Here are the pictures of the outer shells taking shape!
5434566242_c24c557dd8_z-2011-03-2-09-00.jpg
I adore the fabric. If you look in the background of the picture you can see the lining, cream with orange blossoms.
Love it!!!
5440559973_1bcf218172_b-2011-03-2-09-00.jpg
Look at these coordinating fab fabrics. I can’t wait to see more!
5448050895_ffe42c6e32-2011-03-2-09-00.jpg
This is just one of the two bags Stephanie is making! They both already look amazing! Can’t wait to see the lining pictures too!
5462802297_8e49e92456-2011-03-2-09-00.jpg
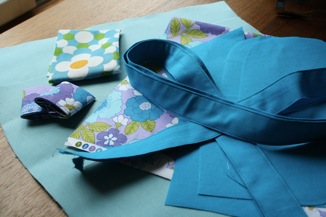
This is a fun picture you can see where she has been and the journey she is about to take!
Thank you for sharing this picture with the group.
5481412573_262f2014bb_b-2011-03-2-09-00.jpg
Here are my pictures of the outer shell. I am working with leather (lamb skin) which is new adventure for me! Lamb skin is a good leather to start with because it is so thin. I did use interfacing. Even though you should not iron leather, I did iron the interfacing onto it with a cloth covering the leather to protect it. 
5481412807_a61e095785_b-2011-03-2-09-00.jpg
Also I had a blog reader write...Screenshot2011-03-02at8.54.19AM-2011-03-2-09-00.png
There is another way!Take a long piece of floss and zig zag stitch over the floss. (Make sure the floss is not sewn.) When you are finished sewing a zig zag stitch over the floss for the length of the project pull the fabric and it will gather for you just like a shower curtain on a straight rod. Best Wishes! Thank you for sharing your pictures with the Flickr: Sew Spoiled Cabrio Tote Sew Along group.
6429E12C38E1D1A63D84EB0D937554A4-2011-03-2-09-00.png

Comments

Popular posts from this blog

Sweet Coin Purse Tutorial for Teacher Gifts

This time of year is so special to me because I get to show my gratitude for all of the hard work that goes into teaching my daughters. I love to make handmade gifts and this year is no exception. Since money does not grow on trees around here, I looked at my stash (I keep my scraps in hat boxes ) and tried to see what I had a lot of; small zippers, trims, Peltex strips ( from making iPad cases ), fabric scraps and some hardware for key fobs. So I set to work.  Materials: Plastic multipurpose 5" Zipper  Fabric Scraps Lightweight interfacing 808 Pellon Trims (We clipped  key fobs  with 1.5" swivel hooks onto our coin purses . There are tons of tutorials on making key fobs .) Step 1: Print out the Coin Purse Template  PDF.  Cut 2 main fabric, cut 2 lining and 2 interfacing using the template.  Optional: Cut a 2"X2" square of your choice main fabric or lining. This strip of fabric is used to clip a key fob to your coin purse later....

Veruca Salt Dress

Every year we perform a musical and one of the highlights for me as a theater mom and seamstress is I get to make costumes! I love sewing and when I can sew for a show or for a music reason it is awesome! This year was Willy Wonka and the Chocolate Factory and I was able to recreate Veruca's red dress. The first step is to find a sewing pattern that I can manipulate to look like what the character needs.  I wanted to make the dress out of Pont de Roma fabric so it moved with the actress. Then I remembered the  Marianne Dress by Christine Haynes , it is perfect because it also had a peter pan collar. The peter pan collar did have some issues. I did not want a t-shirt binding. Also, the back of the collar did not have a collar. I drafted a back collar piece and since the opening was not stretchy, I created a keyhole with a button and loop closure. I lengthened the sleeves and used the cuffs from the pattern for long sleeves. Next, we added the buttons! We al...

Fun in the Sun Mermaid Tutorial

Sewing Materials: 1/4 yard of Lycra or  5T or larger old swimsuit Thread Stretch Needle (helps) Sewing Machine and Sewing Notions Print the PDF patterns pieces out and tape them together. ✄✄✄✄✄✄✄✄✄✄✄ ✄✄✄✄ ✄✄ Step 1: Cutting Layout-  Place the templates over the fabric and cut. ✄✄✄✄✄✄✄✄✄✄✄ ✄✄✄✄ ✄✄ Step 2:   Fold the top edges of the mermaid tail and sew across. ✄✄✄✄✄✄✄✄✄✄✄ ✄✄✄✄ ✄✄ Step 3: Place the mermaid tale pieces right sides together. Sew around the mermaid tail using the stretch stitch, it looks like a bolt of lighting. ✄✄✄✄✄✄✄✄✄✄✄ ✄✄✄✄ ✄✄ Step 4: Flip the mermaid tail right side out using a chopstick.   Option: You can add Poly-fil to make the end of the tale puffy.   Set aside. ✄✄✄✄✄✄✄✄✄✄✄ ✄✄✄✄ ✄✄ Bodice   Step 1: Cut a bodice measuring  4.5” X1.5” or use template. ✄✄✄✄✄✄✄✄✄✄✄ ✄✄✄✄ ✄✄ Step 2: Fold the bodice right sides together and sew the  short ends making a loop. Use the e...