
Cabrio Tote Sew Along: Lining Closed

Here are a few of the lining pictures from our flickr group. Everyone seems to be doing well! I can’t believe that we only have 4 more days! Hopefully if you have joined the sew along you are adding the finishing touches to your tote. Please remember to add your pictures to our Flickr: Sew Spoiled Cabrio Tote Sew Along group. Not only is it fun to see what everyone is making but now you can also win a fun prize. Five Sew Spoiled epatterns will be awarded March 8, 2011 for theses photos...
1. Most Inspiring, 
2. Craziest Camera angle,
3. Loveliest Light,
4. Bag Making Magic,and
 
        5. "Oops, I meant to do That?"
Also when you submit a photo it might inspire someone else to sew their own tote.
5483400240_57bbb2e0f2-2011-03-5-06-00.jpg
5483400258_d2bb308736_m-2011-03-5-06-00.jpg
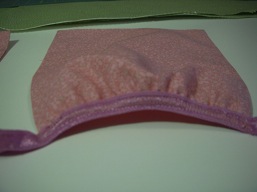
These first two pictures are from tjachetta’s Photo stream. Thank you for sharing these great pictures of the lining and pockets.
✄✄✄✄✄✄✄✄✄✄✄✄✄✄✄✄✄✄✄✄✄✄✄✄✄✄✄✄✄✄✄✄✄✄✄✄✄✄
5493306358_152ce05d8b-2011-03-5-06-00.jpg
This is just the lining and it is beautiful! Thank you for sharing.
Sew Spoiled Tip: When you are creating a lining for a bag, it is smart to choose a bright fabric instead of a darker print.
This way when you dive into your bag to look for something, it does not look like the black hole.
✄✄✄✄✄✄✄✄✄✄✄✄✄✄✄✄✄✄✄✄✄✄✄✄✄✄✄✄✄✄✄✄✄✄✄✄✄✄
5492816587_7d4de28b40-2011-03-5-06-00.jpg
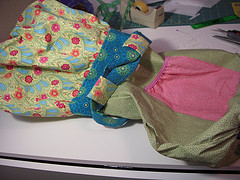
This is my lining. I am working on the gathering stage in this photo. I love Amy Butler fabric!
Happy Sewing!
6429E12C38E1D1A63D84EB0D937554A4-2011-03-5-06-00.png

Comments

Popular posts from this blog

Sweet Coin Purse Tutorial for Teacher Gifts

This time of year is so special to me because I get to show my gratitude for all of the hard work that goes into teaching my daughters. I love to make handmade gifts and this year is no exception. Since money does not grow on trees around here, I looked at my stash (I keep my scraps in hat boxes ) and tried to see what I had a lot of; small zippers, trims, Peltex strips ( from making iPad cases ), fabric scraps and some hardware for key fobs. So I set to work.  Materials: Plastic multipurpose 5" Zipper  Fabric Scraps Lightweight interfacing 808 Pellon Trims (We clipped  key fobs  with 1.5" swivel hooks onto our coin purses . There are tons of tutorials on making key fobs .) Step 1: Print out the Coin Purse Template  PDF.  Cut 2 main fabric, cut 2 lining and 2 interfacing using the template.  Optional: Cut a 2"X2" square of your choice main fabric or lining. This strip of fabric is used to clip a key fob to your coin purse later....

Fun in the Sun Mermaid Tutorial

Sewing Materials: 1/4 yard of Lycra or  5T or larger old swimsuit Thread Stretch Needle (helps) Sewing Machine and Sewing Notions Print the PDF patterns pieces out and tape them together. ✄✄✄✄✄✄✄✄✄✄✄ ✄✄✄✄ ✄✄ Step 1: Cutting Layout-  Place the templates over the fabric and cut. ✄✄✄✄✄✄✄✄✄✄✄ ✄✄✄✄ ✄✄ Step 2:   Fold the top edges of the mermaid tail and sew across. ✄✄✄✄✄✄✄✄✄✄✄ ✄✄✄✄ ✄✄ Step 3: Place the mermaid tale pieces right sides together. Sew around the mermaid tail using the stretch stitch, it looks like a bolt of lighting. ✄✄✄✄✄✄✄✄✄✄✄ ✄✄✄✄ ✄✄ Step 4: Flip the mermaid tail right side out using a chopstick.   Option: You can add Poly-fil to make the end of the tale puffy.   Set aside. ✄✄✄✄✄✄✄✄✄✄✄ ✄✄✄✄ ✄✄ Bodice   Step 1: Cut a bodice measuring  4.5” X1.5” or use template. ✄✄✄✄✄✄✄✄✄✄✄ ✄✄✄✄ ✄✄ Step 2: Fold the bodice right sides together and sew the  short ends making a loop. Use the e...

Cute as a Button Bookmark Tutorial

These are called Cute as a Button Bookmakers. They are cheap, easy to make and are wonderful gifts!  All you need is  Bookmarkers/ PaperClips Size 45 or 1 1/8" Button Covers and kit Glue Gun Pliers (which you won't need if you get the flat back buttons). Step 1: Make a few fabric covered buttons.  These are size 45 or 1 1/8" buttons. Step 2: If you use normal buttons you will need to take the loops off to make them flat. However you can buy flat back buttons and not have to worry about the loop. Step 3: Add a dab of hot glue to the top of the large paperclip pad and place your fabric button on top of the glue. Step 4: Let it cool and it's ready to use! Happy Crafting!