
Back to School Tutorials!

Well, it is that time of year again. The stores are hopping with parents trying to find best deals and students buy the supplies they need for school. I enjoy making something special for my kids return to school. Maybe a lunch box, backpack or pencil case. I found some simple tutorials and good information for making or buying that school backpack.


This Free Backpack Pattern was featured on Sew Mama Sew by Rachel Measham-Pywell from Four Wise Monkeys! It is super cute and with one trip to the fabric store your child can have a unique backpack that no one else has. Make sure to size your childā€™s backpack with this guide in mind!
Screenshot2010-08-16at7.39.03AM-2010-08-16-08-00.png
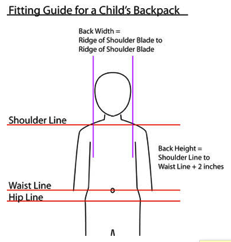
I found a great guide for sizing your childā€™s Backpack at About.com. This is a great resource! Make sure you buy or sew a backpack that is the correct size for your child!
Screenshot2010-08-16at7.09.26AM-2010-08-16-08-00.png
The Draw String Lunch bag tutorialis from Pink Penguin! It is super cute and easy to follow with great pictures for each step!
Screenshot2010-08-16at7.20.37AM-2010-08-16-08-00.png
Last but not least, the Nap Mat/ Bed Roll by Prudent Babylooks super comfy and warm. If you have a little one that hates nap time this would be a terrific way to make nap time fun!
Happy Sewing!
~Leah

Comments

Country Mouse saidā€¦
Super cute projects!!! Thanks for the links!!!
ayumills saidā€¦
Thank you for linking to my tutorial, Leah!

Popular posts from this blog

Sweet Coin Purse Tutorial for Teacher Gifts

This time of year is so special to me because I get to show my gratitude for all of the hard work that goes into teaching my daughters. I love to make handmade gifts and this year is no exception. Since money does not grow on trees around here, I looked at my stash (I keep my scraps in hat boxes ) and tried to see what I had a lot of; small zippers, trims, Peltex strips ( from making iPad cases ), fabric scraps and some hardware for key fobs. So I set to work.  Materials: Plastic multipurpose 5" Zipper  Fabric Scraps Lightweight interfacing 808 Pellon Trims (We clipped  key fobs  with 1.5" swivel hooks onto our coin purses . There are tons of tutorials on making key fobs .) Step 1: Print out the Coin Purse Template  PDF.  Cut 2 main fabric, cut 2 lining and 2 interfacing using the template.  Optional: Cut a 2"X2" square of your choice main fabric or lining. This strip of fabric is used to clip a key fob to your coin purse later....

Fun in the Sun Mermaid Tutorial

Sewing Materials: 1/4 yard of Lycra or  5T or larger old swimsuit Thread Stretch Needle (helps) Sewing Machine and Sewing Notions Print the PDF patterns pieces out and tape them together. āœ„āœ„āœ„āœ„āœ„āœ„āœ„āœ„āœ„āœ„āœ„ āœ„āœ„āœ„āœ„ āœ„āœ„ Step 1: Cutting Layout-  Place the templates over the fabric and cut. āœ„āœ„āœ„āœ„āœ„āœ„āœ„āœ„āœ„āœ„āœ„ āœ„āœ„āœ„āœ„ āœ„āœ„ Step 2:   Fold the top edges of the mermaid tail and sew across. āœ„āœ„āœ„āœ„āœ„āœ„āœ„āœ„āœ„āœ„āœ„ āœ„āœ„āœ„āœ„ āœ„āœ„ Step 3: Place the mermaid tale pieces right sides together. Sew around the mermaid tail using the stretch stitch, it looks like a bolt of lighting. āœ„āœ„āœ„āœ„āœ„āœ„āœ„āœ„āœ„āœ„āœ„ āœ„āœ„āœ„āœ„ āœ„āœ„ Step 4: Flip the mermaid tail right side out using a chopstick.   Option: You can add Poly-fil to make the end of the tale puffy.   Set aside. āœ„āœ„āœ„āœ„āœ„āœ„āœ„āœ„āœ„āœ„āœ„ āœ„āœ„āœ„āœ„ āœ„āœ„ Bodice   Step 1: Cut a bodice measuring  4.5ā€ X1.5ā€ or use template. āœ„āœ„āœ„āœ„āœ„āœ„āœ„āœ„āœ„āœ„āœ„ āœ„āœ„āœ„āœ„ āœ„āœ„ Step 2: Fold the bodice right sides together and sew the  short ends making a loop. Use the e...

Cute as a Button Bookmark Tutorial

These are called Cute as a Button Bookmakers. They are cheap, easy to make and are wonderful gifts!  All you need is  Bookmarkers/ PaperClips Size 45 or 1 1/8" Button Covers and kit Glue Gun Pliers (which you won't need if you get the flat back buttons). Step 1: Make a few fabric covered buttons.  These are size 45 or 1 1/8" buttons. Step 2: If you use normal buttons you will need to take the loops off to make them flat. However you can buy flat back buttons and not have to worry about the loop. Step 3: Add a dab of hot glue to the top of the large paperclip pad and place your fabric button on top of the glue. Step 4: Let it cool and it's ready to use! Happy Crafting!