
Super Easy Butter Cookies!

step1-2010-08-17-19-22.jpg
Ingredients:
1 stick of margarine at room temperature
1 cup of flour
4 tablespoons of sugar
1/4 teaspoon salt
1 teaspoon of vanilla
Preheat oven to 350 degrees.
step2a-2010-08-17-19-22.jpg
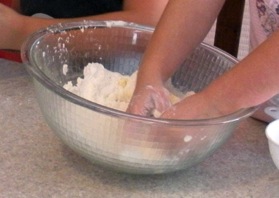
Step 1: Mix the ingredients all together with your hands or a fork.
step5a-2010-08-17-19-22.jpg
Step 2: Make 1ā€ dough balls and place them on a cookie sheet. Press the cookies down with a fork making a crisscross pattern.
Step5-2010-08-17-19-22.jpg
Step 3: Bake for 10 minutes at 350 degrees. Let cool and enjoy! Makes 15 Butter Cookies!
This is a small recipe but if you want to make more simply double the ingredients.
Recipe by Joyce Andrews from My Things To Do Book.  
These extra cute printable tags by Pen and Paper Studio Design would make a cute teachers gift for back to school
Or for the kids!
Screenshot2010-08-17at7.49.53PM-2010-08-17-19-22.png
6429E12C38E1D1A63D84EB0D937554A4-2010-08-17-19-22.png

Comments

I put these in the oven about 7 minutes ago and they smell lovely! Thanks for the quick cookie recipe!
Mom2fur saidā€¦
I love butter cookies! I'll be trying this recipe soon (we have to finish the Cocoa Krispies treats, first) and I'm sure we'll all love it!
Unknown saidā€¦
thanks so much for sharing the tags i created!! your butter cookies look delicious!! *wink*

Popular posts from this blog

Sweet Coin Purse Tutorial for Teacher Gifts

This time of year is so special to me because I get to show my gratitude for all of the hard work that goes into teaching my daughters. I love to make handmade gifts and this year is no exception. Since money does not grow on trees around here, I looked at my stash (I keep my scraps in hat boxes ) and tried to see what I had a lot of; small zippers, trims, Peltex strips ( from making iPad cases ), fabric scraps and some hardware for key fobs. So I set to work.  Materials: Plastic multipurpose 5" Zipper  Fabric Scraps Lightweight interfacing 808 Pellon Trims (We clipped  key fobs  with 1.5" swivel hooks onto our coin purses . There are tons of tutorials on making key fobs .) Step 1: Print out the Coin Purse Template  PDF.  Cut 2 main fabric, cut 2 lining and 2 interfacing using the template.  Optional: Cut a 2"X2" square of your choice main fabric or lining. This strip of fabric is used to clip a key fob to your coin purse later....

Fun in the Sun Mermaid Tutorial

Sewing Materials: 1/4 yard of Lycra or  5T or larger old swimsuit Thread Stretch Needle (helps) Sewing Machine and Sewing Notions Print the PDF patterns pieces out and tape them together. āœ„āœ„āœ„āœ„āœ„āœ„āœ„āœ„āœ„āœ„āœ„ āœ„āœ„āœ„āœ„ āœ„āœ„ Step 1: Cutting Layout-  Place the templates over the fabric and cut. āœ„āœ„āœ„āœ„āœ„āœ„āœ„āœ„āœ„āœ„āœ„ āœ„āœ„āœ„āœ„ āœ„āœ„ Step 2:   Fold the top edges of the mermaid tail and sew across. āœ„āœ„āœ„āœ„āœ„āœ„āœ„āœ„āœ„āœ„āœ„ āœ„āœ„āœ„āœ„ āœ„āœ„ Step 3: Place the mermaid tale pieces right sides together. Sew around the mermaid tail using the stretch stitch, it looks like a bolt of lighting. āœ„āœ„āœ„āœ„āœ„āœ„āœ„āœ„āœ„āœ„āœ„ āœ„āœ„āœ„āœ„ āœ„āœ„ Step 4: Flip the mermaid tail right side out using a chopstick.   Option: You can add Poly-fil to make the end of the tale puffy.   Set aside. āœ„āœ„āœ„āœ„āœ„āœ„āœ„āœ„āœ„āœ„āœ„ āœ„āœ„āœ„āœ„ āœ„āœ„ Bodice   Step 1: Cut a bodice measuring  4.5ā€ X1.5ā€ or use template. āœ„āœ„āœ„āœ„āœ„āœ„āœ„āœ„āœ„āœ„āœ„ āœ„āœ„āœ„āœ„ āœ„āœ„ Step 2: Fold the bodice right sides together and sew the  short ends making a loop. Use the e...

Cute as a Button Bookmark Tutorial

These are called Cute as a Button Bookmakers. They are cheap, easy to make and are wonderful gifts!  All you need is  Bookmarkers/ PaperClips Size 45 or 1 1/8" Button Covers and kit Glue Gun Pliers (which you won't need if you get the flat back buttons). Step 1: Make a few fabric covered buttons.  These are size 45 or 1 1/8" buttons. Step 2: If you use normal buttons you will need to take the loops off to make them flat. However you can buy flat back buttons and not have to worry about the loop. Step 3: Add a dab of hot glue to the top of the large paperclip pad and place your fabric button on top of the glue. Step 4: Let it cool and it's ready to use! Happy Crafting!