
Paper Doll Fun!

Paperdollcrafts-2010-08-5-01-00.jpg
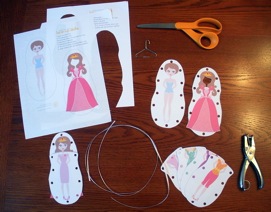
I am so thankful that I have two daughters! I enjoy playing Barbies, Animal Doctor and now Paper dolls with them! If you have daughters, even adult age daughters, they would still enjoy these! First you will need to go to Yellow Mums she has the printable PDF free on her blog! My favorite part about these special paper dolls is that your little ones can practice their fine motor skills lacing or sewing the clothes to the doll. That was a plus because my 3 year likes to take her paper dolls with her wherever she goes!!! We have played with paper dolls before and their clothes off and she would get frustrated but with Yellow Mums, Lace up Paper Dolls the clothes stay on!!
doll-2010-08-5-01-00.jpg
If you are looking for more paper dolls, we found a wonderful site for vintage paper dolls!! Ann of Paper Doll Land is awesome. She has more than 20 different doll sets to choose from!!! We love the Liddle Kiddles Dolls!
By the way my oldest loves animals and would love paper animals to play with. If you find them online please share the link so we can go check them out!
Thanks!
6429E12C38E1D1A63D84EB0D937554A4-2010-08-5-01-00.png

Comments

Michelle saidā€¦
Oh, I'm a paper doll girl! They were one of my favorite toys growing up and am looking forward to passing my collection on to my daughter! These look great, I will have to check out this site! Paper dolls are harder to find these days.
Twins Squared saidā€¦
It's so funny that you just posted about paper dolls because I happened upon a great site for paper dolls just yesterday. Check out http://www.minimepaperdolls.com/. You can order specific hair color, eye color, etc. to make them look like your little girl. Them come with a cd so you can print over and over. I was thinking of these for my girls' birthday.

Popular posts from this blog

Sweet Coin Purse Tutorial for Teacher Gifts

This time of year is so special to me because I get to show my gratitude for all of the hard work that goes into teaching my daughters. I love to make handmade gifts and this year is no exception. Since money does not grow on trees around here, I looked at my stash (I keep my scraps in hat boxes ) and tried to see what I had a lot of; small zippers, trims, Peltex strips ( from making iPad cases ), fabric scraps and some hardware for key fobs. So I set to work.  Materials: Plastic multipurpose 5" Zipper  Fabric Scraps Lightweight interfacing 808 Pellon Trims (We clipped  key fobs  with 1.5" swivel hooks onto our coin purses . There are tons of tutorials on making key fobs .) Step 1: Print out the Coin Purse Template  PDF.  Cut 2 main fabric, cut 2 lining and 2 interfacing using the template.  Optional: Cut a 2"X2" square of your choice main fabric or lining. This strip of fabric is used to clip a key fob to your coin purse later....

Fun in the Sun Mermaid Tutorial

Sewing Materials: 1/4 yard of Lycra or  5T or larger old swimsuit Thread Stretch Needle (helps) Sewing Machine and Sewing Notions Print the PDF patterns pieces out and tape them together. āœ„āœ„āœ„āœ„āœ„āœ„āœ„āœ„āœ„āœ„āœ„ āœ„āœ„āœ„āœ„ āœ„āœ„ Step 1: Cutting Layout-  Place the templates over the fabric and cut. āœ„āœ„āœ„āœ„āœ„āœ„āœ„āœ„āœ„āœ„āœ„ āœ„āœ„āœ„āœ„ āœ„āœ„ Step 2:   Fold the top edges of the mermaid tail and sew across. āœ„āœ„āœ„āœ„āœ„āœ„āœ„āœ„āœ„āœ„āœ„ āœ„āœ„āœ„āœ„ āœ„āœ„ Step 3: Place the mermaid tale pieces right sides together. Sew around the mermaid tail using the stretch stitch, it looks like a bolt of lighting. āœ„āœ„āœ„āœ„āœ„āœ„āœ„āœ„āœ„āœ„āœ„ āœ„āœ„āœ„āœ„ āœ„āœ„ Step 4: Flip the mermaid tail right side out using a chopstick.   Option: You can add Poly-fil to make the end of the tale puffy.   Set aside. āœ„āœ„āœ„āœ„āœ„āœ„āœ„āœ„āœ„āœ„āœ„ āœ„āœ„āœ„āœ„ āœ„āœ„ Bodice   Step 1: Cut a bodice measuring  4.5ā€ X1.5ā€ or use template. āœ„āœ„āœ„āœ„āœ„āœ„āœ„āœ„āœ„āœ„āœ„ āœ„āœ„āœ„āœ„ āœ„āœ„ Step 2: Fold the bodice right sides together and sew the  short ends making a loop. Use the e...

Cute as a Button Bookmark Tutorial

These are called Cute as a Button Bookmakers. They are cheap, easy to make and are wonderful gifts!  All you need is  Bookmarkers/ PaperClips Size 45 or 1 1/8" Button Covers and kit Glue Gun Pliers (which you won't need if you get the flat back buttons). Step 1: Make a few fabric covered buttons.  These are size 45 or 1 1/8" buttons. Step 2: If you use normal buttons you will need to take the loops off to make them flat. However you can buy flat back buttons and not have to worry about the loop. Step 3: Add a dab of hot glue to the top of the large paperclip pad and place your fabric button on top of the glue. Step 4: Let it cool and it's ready to use! Happy Crafting!