
Laptop/ iPad Sleeve Pattern Update!

Sleeve-2010-07-28-13-22.jpg
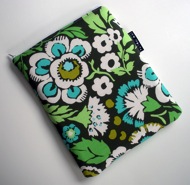
As you might already know my family recently bought an iPad tablet! Which we all fight over because it is so very useful!!! I decided to check up on the Sew Spoiled Laptop/ eReader sleeve pattern and at the same time make this adorable iPad sleeve! While I was cutting I realized a few things and I want to share them with you. Especially if you have this pattern already or if you want to buy it for covering a tablet or eReader.
Peekaboo-2010-07-28-13-22.jpg
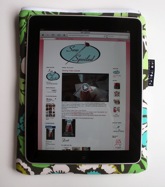
You will still need the Sew Spoiled Laptop/ eReader Sleeve pattern it will show you how to add straps, how to install the zipper and over all how to make the sleeve. If you are making a sleeve for a tablet like the iPad or an eReader this update is for you!!!!
AmyButlerIpadsleeve-2010-07-28-13-22.jpg
It is easy to adapt the pattern to these devices just subtract 1/2" less than what is state in the original Sew Spoiled Laptop Sleeve instructions.
Then I followed the Sew Spoiled Laptop/ eReader Sleeve pattern word for word until you go to sewing around the sleeve. I used a 3/4ā€ seam allowance to make it snug but not too tight. :)

Did you know that Apple has sold approximately 3.27 million iPads! Wow!

Only 2 more days of the Sew Spoiled BOGO coupon code: ā€Sew Spoil Meā€.
When you buy any Sew Spoiled epattern, write in the message to seller ā€œSew Spoil Meā€ and you will receive the Sew Spoiled Ladybug Apron epattern FREE!
This BOGO deal is only available at my Sew Spoiled Etsy shop!!
6429E12C38E1D1A63D84EB0D937554A4-2010-07-28-13-22.png

Comments

Unknown saidā€¦
Super cute!! We fight over our iPad, too! :)
Liz Thomson saidā€¦
We love the ipad! Love your cover! We really need one!

Popular posts from this blog

Sweet Coin Purse Tutorial for Teacher Gifts

This time of year is so special to me because I get to show my gratitude for all of the hard work that goes into teaching my daughters. I love to make handmade gifts and this year is no exception. Since money does not grow on trees around here, I looked at my stash (I keep my scraps in hat boxes ) and tried to see what I had a lot of; small zippers, trims, Peltex strips ( from making iPad cases ), fabric scraps and some hardware for key fobs. So I set to work.  Materials: Plastic multipurpose 5" Zipper  Fabric Scraps Lightweight interfacing 808 Pellon Trims (We clipped  key fobs  with 1.5" swivel hooks onto our coin purses . There are tons of tutorials on making key fobs .) Step 1: Print out the Coin Purse Template  PDF.  Cut 2 main fabric, cut 2 lining and 2 interfacing using the template.  Optional: Cut a 2"X2" square of your choice main fabric or lining. This strip of fabric is used to clip a key fob to your coin purse later....

Fun in the Sun Mermaid Tutorial

Sewing Materials: 1/4 yard of Lycra or  5T or larger old swimsuit Thread Stretch Needle (helps) Sewing Machine and Sewing Notions Print the PDF patterns pieces out and tape them together. āœ„āœ„āœ„āœ„āœ„āœ„āœ„āœ„āœ„āœ„āœ„ āœ„āœ„āœ„āœ„ āœ„āœ„ Step 1: Cutting Layout-  Place the templates over the fabric and cut. āœ„āœ„āœ„āœ„āœ„āœ„āœ„āœ„āœ„āœ„āœ„ āœ„āœ„āœ„āœ„ āœ„āœ„ Step 2:   Fold the top edges of the mermaid tail and sew across. āœ„āœ„āœ„āœ„āœ„āœ„āœ„āœ„āœ„āœ„āœ„ āœ„āœ„āœ„āœ„ āœ„āœ„ Step 3: Place the mermaid tale pieces right sides together. Sew around the mermaid tail using the stretch stitch, it looks like a bolt of lighting. āœ„āœ„āœ„āœ„āœ„āœ„āœ„āœ„āœ„āœ„āœ„ āœ„āœ„āœ„āœ„ āœ„āœ„ Step 4: Flip the mermaid tail right side out using a chopstick.   Option: You can add Poly-fil to make the end of the tale puffy.   Set aside. āœ„āœ„āœ„āœ„āœ„āœ„āœ„āœ„āœ„āœ„āœ„ āœ„āœ„āœ„āœ„ āœ„āœ„ Bodice   Step 1: Cut a bodice measuring  4.5ā€ X1.5ā€ or use template. āœ„āœ„āœ„āœ„āœ„āœ„āœ„āœ„āœ„āœ„āœ„ āœ„āœ„āœ„āœ„ āœ„āœ„ Step 2: Fold the bodice right sides together and sew the  short ends making a loop. Use the e...

Cute as a Button Bookmark Tutorial

These are called Cute as a Button Bookmakers. They are cheap, easy to make and are wonderful gifts!  All you need is  Bookmarkers/ PaperClips Size 45 or 1 1/8" Button Covers and kit Glue Gun Pliers (which you won't need if you get the flat back buttons). Step 1: Make a few fabric covered buttons.  These are size 45 or 1 1/8" buttons. Step 2: If you use normal buttons you will need to take the loops off to make them flat. However you can buy flat back buttons and not have to worry about the loop. Step 3: Add a dab of hot glue to the top of the large paperclip pad and place your fabric button on top of the glue. Step 4: Let it cool and it's ready to use! Happy Crafting!