
Weekend Project:Colette Madeline Mini Bloomers, Part 2

Yesterday I started this simple project! It comes from Colette Patterns, it is the Madeline Mini Bloomers. If you want to follow along grab the pattern at Colette Patterns! She also has an awesome fabric Giveaway through Sew Mama Sew! (By the way you can find Sew Spoiled Patterns at Sew Mama Sew Now!) The giveaway runs through July 28, 2010. Just post a comment on Collete Patterns Facebook Page. This is a continuation of the Mini Bloomers project. I am going to finish it through the weekend. Tomorrow we will finish! Yeah!
5pin-2010-07-23-17-58.jpg6sewseam-2010-07-23-17-58.jpg7finishseam-2010-07-23-17-58.jpg
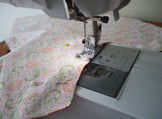
Step 5: (Center Seams) Pin, sew and finish the seam.
I chose to serge the seams to finish them.
10pincrotch-2010-07-23-17-58.jpg10sewcrotch-2010-07-23-17-58.jpg10finishseam-2010-07-23-17-58.jpg
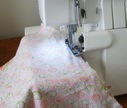
Step 6: (Crotch Seam) Pin, sew and finish the seams.
11pinsideseams-2010-07-23-17-58.jpg11sewsideseams-2010-07-23-17-58.jpg11finishseam-2010-07-23-17-58.jpg
Step 7: (Side Seams) Pin, sew and finish the seams.
  12rollhem-2010-07-23-17-58.jpg122inchfol-2010-07-23-17-58.jpg122inchfold-2010-07-23-17-58.jpg
Step 8: (Waistband) Finish the raw edge of the waistband and turn over 2". I think you should try it on at this point because I did and I realized that it was not right for my shape. Maybe the style is right for a teenager but not for me, a mother of 2. 
If you want to see how I fixed it, come back here tomorrow and set aside your Madeline Mini Bloomers.
Happy Sewing!
~Leah

Comments

Mama Lusco said…
I've used this pattern to make a pair and they are so great! Next time I'm planning to increase the front rise. So fun!

Popular posts from this blog

Fun in the Sun Mermaid Tutorial

Sewing Materials: 1/4 yard of Lycra or  5T or larger old swimsuit Thread Stretch Needle (helps) Sewing Machine and Sewing Notions Print the PDF patterns pieces out and tape them together. ✄✄✄✄✄✄✄✄✄✄✄ ✄✄✄✄ ✄✄ Step 1: Cutting Layout-  Place the templates over the fabric and cut. ✄✄✄✄✄✄✄✄✄✄✄ ✄✄✄✄ ✄✄ Step 2:   Fold the top edges of the mermaid tail and sew across. ✄✄✄✄✄✄✄✄✄✄✄ ✄✄✄✄ ✄✄ Step 3: Place the mermaid tale pieces right sides together. Sew around the mermaid tail using the stretch stitch, it looks like a bolt of lighting. ✄✄✄✄✄✄✄✄✄✄✄ ✄✄✄✄ ✄✄ Step 4: Flip the mermaid tail right side out using a chopstick.   Option: You can add Poly-fil to make the end of the tale puffy.   Set aside. ✄✄✄✄✄✄✄✄✄✄✄ ✄✄✄✄ ✄✄ Bodice   Step 1: Cut a bodice measuring  4.5” X1.5” or use template. ✄✄✄✄✄✄✄✄✄✄✄ ✄✄✄✄ ✄✄ Step 2: Fold the bodice right sides together and sew the  short ends making a loop. Use the edge of the presser foot for your seam a

How to Line an A-Line Skirt Tutorial

 After you find an A-line skirt pattern , I am using  One Yard Wonders 101  template . Make a muslin of your skirt! It only takes a few minutes to make a muslin version. Just baste stitch the side seams and make adjustments for your hips. Once your template is right you can make all the skirts your heart desires, so it is important to get the perfect fit first. Now we are ready to cut the "good" fabric and sew! ---------------------------------- ---------------------------------- ---------------------------------- ---------------------------------- Flip the skirt right side out and put it on!! You are done!! It is super easy and your new skirt will look store made.  Plus there is no hand stitching the lining to the main fabric. If you have any questions please comment below or email me at leah.sewspoiled@gmail.com .  WooHooo!! A-Line Skirt Pattern Finds

Sweet Coin Purse Tutorial for Teacher Gifts

This time of year is so special to me because I get to show my gratitude for all of the hard work that goes into teaching my daughters. I love to make handmade gifts and this year is no exception. Since money does not grow on trees around here, I looked at my stash (I keep my scraps in hat boxes ) and tried to see what I had a lot of; small zippers, trims, Peltex strips ( from making iPad cases ), fabric scraps and some hardware for key fobs. So I set to work.  Materials: Plastic multipurpose 5" Zipper  Fabric Scraps Lightweight interfacing 808 Pellon Trims (We clipped  key fobs  with 1.5" swivel hooks onto our coin purses . There are tons of tutorials on making key fobs .) Step 1: Print out the Coin Purse Template  PDF.  Cut 2 main fabric, cut 2 lining and 2 interfacing using the template.  Optional: Cut a 2"X2" square of your choice main fabric or lining. This strip of fabric is used to clip a key fob to your coin purse later. We used a 1.5