Putting on the Colette, Madeline Mini Bloomers, I realized that they were too low for me. I have a round shape (The Scientific term is Bubble Butt) and the low rider hip style does not work for me. Anyway, just incase you have this same issue, here is an easy fix. Don’t throw away your work!
Sew Spoiled Twist: We are going to create a casing by cutting two 3”w X (the length of the waist line+1”). Sew the two short 3” side seams.


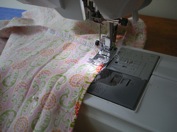
Sew Spoiled Twist: Pin the casing and waist line right sides together. Sew 1/2” seam allowance around the waist line.

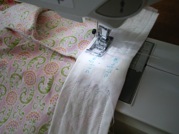
Sew Spoiled Twist: Lift the casing up and over. Start the fold over process again 2” down. I marked the paper shown here at 2” and that helped me iron the casing at exactly 2”.
Turning the raw edge under 1/2”.

Now we can get back on track with Step 9: Sew around the waist line to make the casing for the elastic.

Step 10: Insert the elastic in the 2nd and 4th rows and enclose the casing.
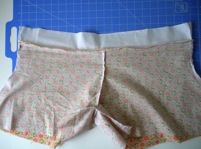
Step 11: Make the button wholes. Finish the leg openings.


Step 12: Make the casing for the leg openings as directed in the Colette Mini Bloomers pattern! I really enjoyed this part of the pattern. I love it when a designer takes me somewhere unexpected. There are a million ways to make the leg opening gather. Shirring with elastic thread or even elastic thread through the casing again like the top. I was so glad to see a new technique! I adore the ribbon!


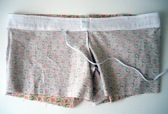
Finally, thread the ribbon through, tie into neat bows and you are done!!


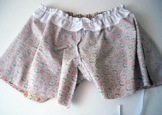
These are the cutest bloomers ever! I hope you enjoyed this weekend project with me. Breaking up a project into small sections makes it easier to complete. I feel better about my week if I know that I spent my time wisely and did something productive. You can enjoy time with family, blogging with friends, cleaning house (yuck) and still get a cute pair of bloomers made all in one weekend!
If you make the Colette Mini Bloomers make sure you post your cute pair of Bloomers on Colette Patterns Flickr Group! Don’t forget Colette Patterns is hosting an awesome fabric Giveaway through Sew Mama Sew! (By the way you can find Sew Spoiled Patterns at Sew Mama Sew too!) The giveaway runs through July 28, 2010. Just post a comment on Collete Patterns Facebook Page.
Have a great Weekend!
~Leah
Sew Spoiled Twist: We are going to create a casing by cutting two 3”w X (the length of the waist line+1”). Sew the two short 3” side seams.
Sew Spoiled Twist: Pin the casing and waist line right sides together. Sew 1/2” seam allowance around the waist line.
Sew Spoiled Twist: Lift the casing up and over. Start the fold over process again 2” down. I marked the paper shown here at 2” and that helped me iron the casing at exactly 2”.
Turning the raw edge under 1/2”.
Now we can get back on track with Step 9: Sew around the waist line to make the casing for the elastic.
Step 10: Insert the elastic in the 2nd and 4th rows and enclose the casing.
Step 11: Make the button wholes. Finish the leg openings.
Step 12: Make the casing for the leg openings as directed in the Colette Mini Bloomers pattern! I really enjoyed this part of the pattern. I love it when a designer takes me somewhere unexpected. There are a million ways to make the leg opening gather. Shirring with elastic thread or even elastic thread through the casing again like the top. I was so glad to see a new technique! I adore the ribbon!
Finally, thread the ribbon through, tie into neat bows and you are done!!
These are the cutest bloomers ever! I hope you enjoyed this weekend project with me. Breaking up a project into small sections makes it easier to complete. I feel better about my week if I know that I spent my time wisely and did something productive. You can enjoy time with family, blogging with friends, cleaning house (yuck) and still get a cute pair of bloomers made all in one weekend!
If you make the Colette Mini Bloomers make sure you post your cute pair of Bloomers on Colette Patterns Flickr Group! Don’t forget Colette Patterns is hosting an awesome fabric Giveaway through Sew Mama Sew! (By the way you can find Sew Spoiled Patterns at Sew Mama Sew too!) The giveaway runs through July 28, 2010. Just post a comment on Collete Patterns Facebook Page.
Have a great Weekend!
~Leah
Comments