
Teacher Tags

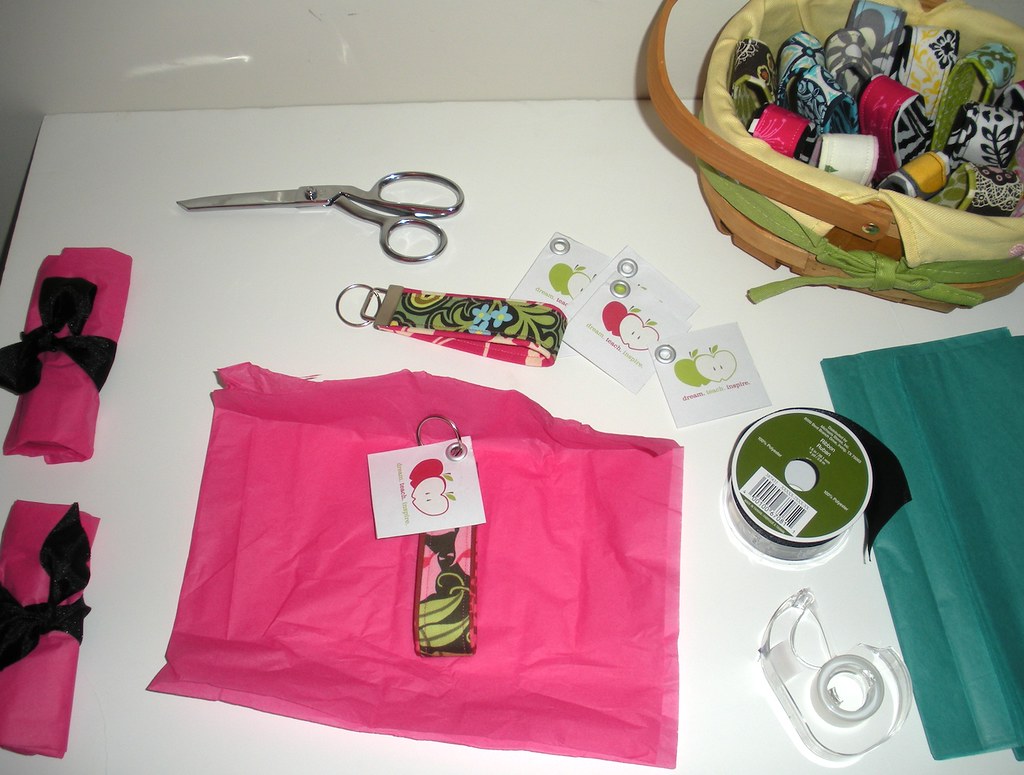
After making these cute Key Fobs, I wanted to wrap them up in a cute fun way. I am not a paper crafty person but these mini printable apple tags from Posh Pixels Design Studio had the perfect message!  "Dream, Teach, Inspire" I printed them out, folded them in half, placed a piece of cardboard in the center and glue it all together. (My kids liked this part because they got to help!) Then I found these silver eyelets and added them to the corners.
Finally, I slipped the teacher tags through the key ring! Ta Da!
Happy Crafting!
~Leah 

Comments

Country Mouse saidā€¦
Rachel....you make us all look bad!! You are super mom, Martha Stewart has nothin' on you!!!
Hey...I have a question? What do you do for the male teachers?
Country Mouse saidā€¦
Ooops, so sorry, didn't mean Rachel. Leah please forgive me, my daughter was talking about Rachel Ray as I was trying to comment! Sorry. LOL!
That is so cute! Thanks for finding such a creative way to use my Teacher Appreciation mini cards! Would you mind if I posted this link & pics on my Facebook Fanpage?

Have a great day!

xo,
Kristy
Sew Spoiled saidā€¦
Sure Kristy! Thanks for stopping by and making a post! I adore your website and printables!
~Leah
https://samaaaagroup.com/%d8%b4%d8%b1%d9%83%d8%a9-%d8%aa%d8%b9%d9%82%d9%8a%d9%85-%d8%a8%d8%ad%d9%8a-%d8%a7%d9%84%d8%a8%d9%86%d8%af%d8%b1%d9%8a%d8%a9/

Popular posts from this blog

Sweet Coin Purse Tutorial for Teacher Gifts

This time of year is so special to me because I get to show my gratitude for all of the hard work that goes into teaching my daughters. I love to make handmade gifts and this year is no exception. Since money does not grow on trees around here, I looked at my stash (I keep my scraps in hat boxes ) and tried to see what I had a lot of; small zippers, trims, Peltex strips ( from making iPad cases ), fabric scraps and some hardware for key fobs. So I set to work.  Materials: Plastic multipurpose 5" Zipper  Fabric Scraps Lightweight interfacing 808 Pellon Trims (We clipped  key fobs  with 1.5" swivel hooks onto our coin purses . There are tons of tutorials on making key fobs .) Step 1: Print out the Coin Purse Template  PDF.  Cut 2 main fabric, cut 2 lining and 2 interfacing using the template.  Optional: Cut a 2"X2" square of your choice main fabric or lining. This strip of fabric is used to clip a key fob to your coin purse later....

Fun in the Sun Mermaid Tutorial

Sewing Materials: 1/4 yard of Lycra or  5T or larger old swimsuit Thread Stretch Needle (helps) Sewing Machine and Sewing Notions Print the PDF patterns pieces out and tape them together. āœ„āœ„āœ„āœ„āœ„āœ„āœ„āœ„āœ„āœ„āœ„ āœ„āœ„āœ„āœ„ āœ„āœ„ Step 1: Cutting Layout-  Place the templates over the fabric and cut. āœ„āœ„āœ„āœ„āœ„āœ„āœ„āœ„āœ„āœ„āœ„ āœ„āœ„āœ„āœ„ āœ„āœ„ Step 2:   Fold the top edges of the mermaid tail and sew across. āœ„āœ„āœ„āœ„āœ„āœ„āœ„āœ„āœ„āœ„āœ„ āœ„āœ„āœ„āœ„ āœ„āœ„ Step 3: Place the mermaid tale pieces right sides together. Sew around the mermaid tail using the stretch stitch, it looks like a bolt of lighting. āœ„āœ„āœ„āœ„āœ„āœ„āœ„āœ„āœ„āœ„āœ„ āœ„āœ„āœ„āœ„ āœ„āœ„ Step 4: Flip the mermaid tail right side out using a chopstick.   Option: You can add Poly-fil to make the end of the tale puffy.   Set aside. āœ„āœ„āœ„āœ„āœ„āœ„āœ„āœ„āœ„āœ„āœ„ āœ„āœ„āœ„āœ„ āœ„āœ„ Bodice   Step 1: Cut a bodice measuring  4.5ā€ X1.5ā€ or use template. āœ„āœ„āœ„āœ„āœ„āœ„āœ„āœ„āœ„āœ„āœ„ āœ„āœ„āœ„āœ„ āœ„āœ„ Step 2: Fold the bodice right sides together and sew the  short ends making a loop. Use the e...

Cute as a Button Bookmark Tutorial

These are called Cute as a Button Bookmakers. They are cheap, easy to make and are wonderful gifts!  All you need is  Bookmarkers/ PaperClips Size 45 or 1 1/8" Button Covers and kit Glue Gun Pliers (which you won't need if you get the flat back buttons). Step 1: Make a few fabric covered buttons.  These are size 45 or 1 1/8" buttons. Step 2: If you use normal buttons you will need to take the loops off to make them flat. However you can buy flat back buttons and not have to worry about the loop. Step 3: Add a dab of hot glue to the top of the large paperclip pad and place your fabric button on top of the glue. Step 4: Let it cool and it's ready to use! Happy Crafting!