
Weekender Tote Sew along: Pockets and Lining with Magnet

Hey Everyone!
I am so excited! We are less than 2 weeks away from our Weekender Tote being complete. We are on page 7 of the Sew Spoiled Weekender Tote epattern. We will be making the interior pocket, sewing the sides of the lining and install the magnet clasp this week.
Here are some pictures from the Sew Spoiled Weekender Tote flickr group!
From Squarebag's photostream, this is Step 7, were she has pinned the base of the outer shell in place.

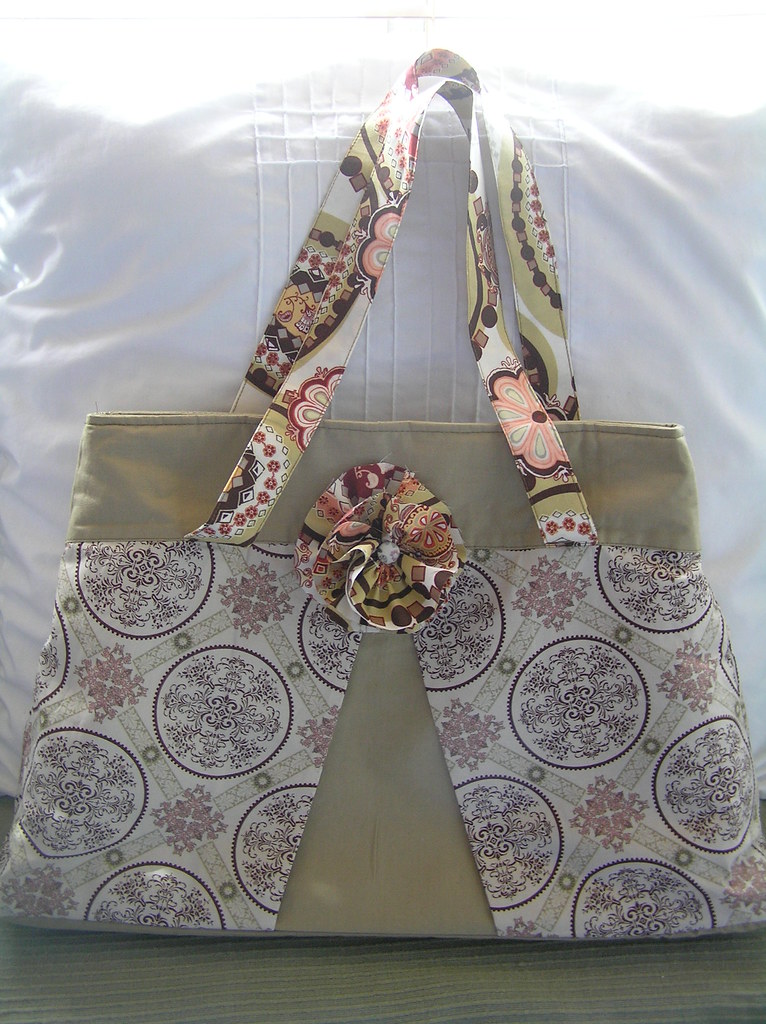
From Little Ditty Designs photostream! She has not only finished but added this beautiful fabric flower!

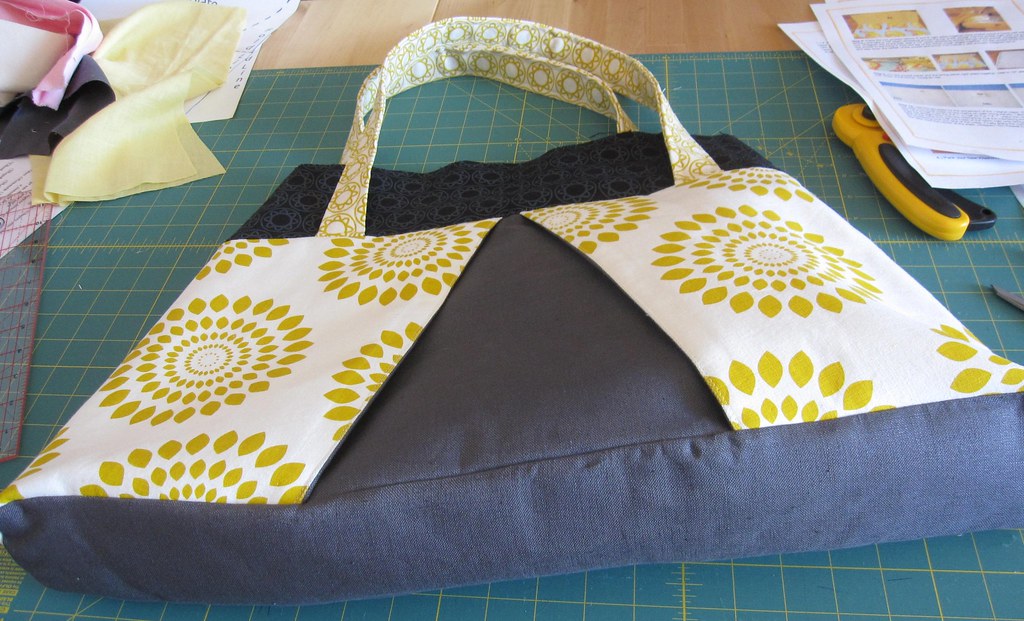
This outer shell, from EmilySue's photostream, is gorgeous!

From 9crafty11, I am so glad you join the sew along!

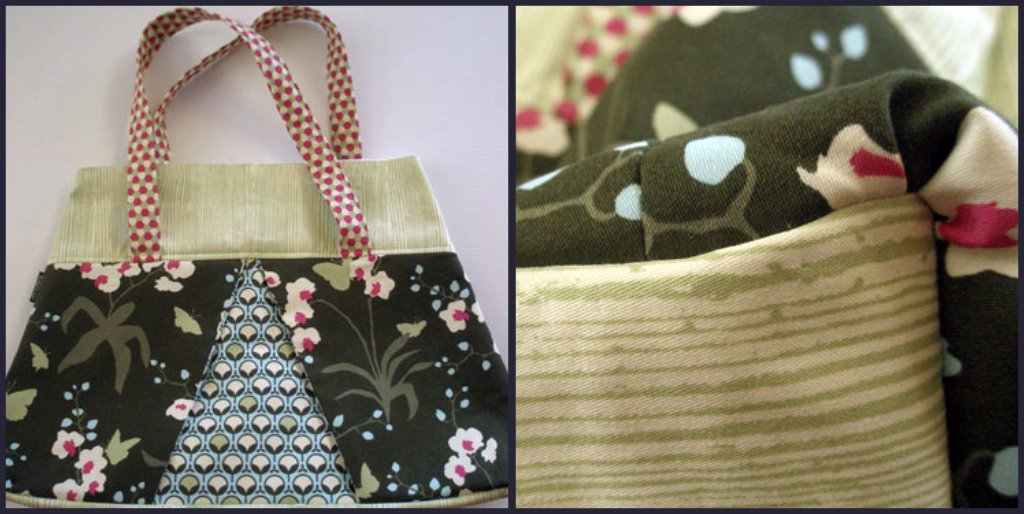
This is the outer shell completed by TheAccidentalCrafter! I love these colors!

From my little hedgehog's photostream, great shot of the sewing process!

My outer shell complete!
If you are having trouble sewing the through the thicknesses of this bag here are some tips.
1.)  Lengthen the stitch to 3-3.5 on your machine when topstitching. 
2.) When sewing over the straps turn the side dial so your needle does not break. 
3.) Use a strong needle in your machine, gauge 14 or 16, will make this part easier!
Also, after many were questioning the base measurements, I went back through my calculations for the base of the tote and you guys are Right!!! I am 1 inch off! It should be 5"X21" for the base of the tote. 
I have updated the epattern already!
Thank you for your pictures and comments. I am learning so much!
~Leah 

Comments

Mama Lusco saidā€¦
Looking good! I'm finished but out of Flickr acct space. Pattern review is on my blog here:

http://mamalusco.blogspot.com/2010/05/weekender-tote-sew-along-results.html

Popular posts from this blog

Sweet Coin Purse Tutorial for Teacher Gifts

This time of year is so special to me because I get to show my gratitude for all of the hard work that goes into teaching my daughters. I love to make handmade gifts and this year is no exception. Since money does not grow on trees around here, I looked at my stash (I keep my scraps in hat boxes ) and tried to see what I had a lot of; small zippers, trims, Peltex strips ( from making iPad cases ), fabric scraps and some hardware for key fobs. So I set to work.  Materials: Plastic multipurpose 5" Zipper  Fabric Scraps Lightweight interfacing 808 Pellon Trims (We clipped  key fobs  with 1.5" swivel hooks onto our coin purses . There are tons of tutorials on making key fobs .) Step 1: Print out the Coin Purse Template  PDF.  Cut 2 main fabric, cut 2 lining and 2 interfacing using the template.  Optional: Cut a 2"X2" square of your choice main fabric or lining. This strip of fabric is used to clip a key fob to your coin purse later....

Fun in the Sun Mermaid Tutorial

Sewing Materials: 1/4 yard of Lycra or  5T or larger old swimsuit Thread Stretch Needle (helps) Sewing Machine and Sewing Notions Print the PDF patterns pieces out and tape them together. āœ„āœ„āœ„āœ„āœ„āœ„āœ„āœ„āœ„āœ„āœ„ āœ„āœ„āœ„āœ„ āœ„āœ„ Step 1: Cutting Layout-  Place the templates over the fabric and cut. āœ„āœ„āœ„āœ„āœ„āœ„āœ„āœ„āœ„āœ„āœ„ āœ„āœ„āœ„āœ„ āœ„āœ„ Step 2:   Fold the top edges of the mermaid tail and sew across. āœ„āœ„āœ„āœ„āœ„āœ„āœ„āœ„āœ„āœ„āœ„ āœ„āœ„āœ„āœ„ āœ„āœ„ Step 3: Place the mermaid tale pieces right sides together. Sew around the mermaid tail using the stretch stitch, it looks like a bolt of lighting. āœ„āœ„āœ„āœ„āœ„āœ„āœ„āœ„āœ„āœ„āœ„ āœ„āœ„āœ„āœ„ āœ„āœ„ Step 4: Flip the mermaid tail right side out using a chopstick.   Option: You can add Poly-fil to make the end of the tale puffy.   Set aside. āœ„āœ„āœ„āœ„āœ„āœ„āœ„āœ„āœ„āœ„āœ„ āœ„āœ„āœ„āœ„ āœ„āœ„ Bodice   Step 1: Cut a bodice measuring  4.5ā€ X1.5ā€ or use template. āœ„āœ„āœ„āœ„āœ„āœ„āœ„āœ„āœ„āœ„āœ„ āœ„āœ„āœ„āœ„ āœ„āœ„ Step 2: Fold the bodice right sides together and sew the  short ends making a loop. Use the e...

Cute as a Button Bookmark Tutorial

These are called Cute as a Button Bookmakers. They are cheap, easy to make and are wonderful gifts!  All you need is  Bookmarkers/ PaperClips Size 45 or 1 1/8" Button Covers and kit Glue Gun Pliers (which you won't need if you get the flat back buttons). Step 1: Make a few fabric covered buttons.  These are size 45 or 1 1/8" buttons. Step 2: If you use normal buttons you will need to take the loops off to make them flat. However you can buy flat back buttons and not have to worry about the loop. Step 3: Add a dab of hot glue to the top of the large paperclip pad and place your fabric button on top of the glue. Step 4: Let it cool and it's ready to use! Happy Crafting!