
Embroidery Help; Lesson 1- What do I need?

I got an embroidery machine now what?
First, you need a few items to make your machine work.

Untitled
  • Make sure you have a stabilizer, my favorite is tear-away
  • Embroidery Thread! Embroidery thread is different than sewing machine thread. It is shiny and made out of polyester, it is better for your machine because the thread has fewer fibers that will clog the machine. Also, You will also want the shine from the thread to stand out above the fabric.
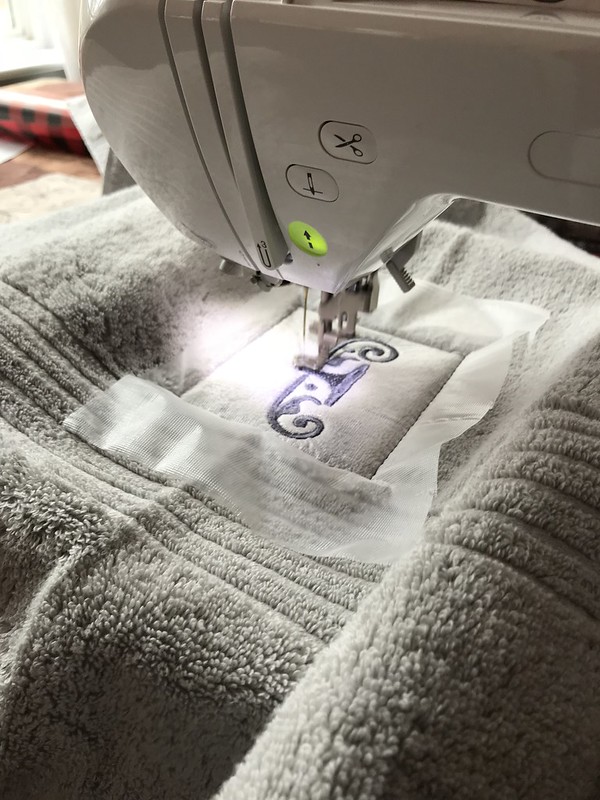
  • If you want to embroider towels, or anything fuzzy, then you will want to purchase Water Soluble Embroidery Stabilizer. This stabilizer is for the top of your embroidery work so the thread will stand up on top of the fluffy fibers of a towel.
  • Embroidery Machine Scissors, these will make it easier for you to trim threads. Sometimes an embroidery design will move across the hoop and you will have extra thread across your design, trim them away while the project is in the hoop.
  • Baste Design! I use this for almost every design! I will show you how later. It is FREE! 
  • Software! My favorite is Embrilliance Embroidery Software. Or buy it directly here! I love this software because it is cheap(er than most embroidery software) and available for PC or MAC.  It will baste your design for you!
Do you have to have all of these items? No, you can certainly make your machine work without them but these items will make life embroidering much easier. If you already embroider and know of other embroidery products please share them with us in the comments!
Best Wishes and Tons of Stitches!
We will talk about setting up next.....

Comments

MGK said…
Thanks so much from you embroidery challenged s-mom. Keep these coming for me and I may actually get it right lol
Sew Spoiled said…
I will, these posts are for you and anyone else who needs help. If you have questions please ask them. :)
Julia Robert said…
This comment has been removed by the author.

Popular posts from this blog

Fun in the Sun Mermaid Tutorial

Sewing Materials: 1/4 yard of Lycra or  5T or larger old swimsuit Thread Stretch Needle (helps) Sewing Machine and Sewing Notions Print the PDF patterns pieces out and tape them together. ✄✄✄✄✄✄✄✄✄✄✄ ✄✄✄✄ ✄✄ Step 1: Cutting Layout-  Place the templates over the fabric and cut. ✄✄✄✄✄✄✄✄✄✄✄ ✄✄✄✄ ✄✄ Step 2:   Fold the top edges of the mermaid tail and sew across. ✄✄✄✄✄✄✄✄✄✄✄ ✄✄✄✄ ✄✄ Step 3: Place the mermaid tale pieces right sides together. Sew around the mermaid tail using the stretch stitch, it looks like a bolt of lighting. ✄✄✄✄✄✄✄✄✄✄✄ ✄✄✄✄ ✄✄ Step 4: Flip the mermaid tail right side out using a chopstick.   Option: You can add Poly-fil to make the end of the tale puffy.   Set aside. ✄✄✄✄✄✄✄✄✄✄✄ ✄✄✄✄ ✄✄ Bodice   Step 1: Cut a bodice measuring  4.5” X1.5” or use template. ✄✄✄✄✄✄✄✄✄✄✄ ✄✄✄✄ ✄✄ Step 2: Fold the bodice right sides together and sew the  short ends making a loop. Use the edge of the presser foot for your seam a

How to Line an A-Line Skirt Tutorial

 After you find an A-line skirt pattern , I am using  One Yard Wonders 101  template . Make a muslin of your skirt! It only takes a few minutes to make a muslin version. Just baste stitch the side seams and make adjustments for your hips. Once your template is right you can make all the skirts your heart desires, so it is important to get the perfect fit first. Now we are ready to cut the "good" fabric and sew! ---------------------------------- ---------------------------------- ---------------------------------- ---------------------------------- Flip the skirt right side out and put it on!! You are done!! It is super easy and your new skirt will look store made.  Plus there is no hand stitching the lining to the main fabric. If you have any questions please comment below or email me at leah.sewspoiled@gmail.com .  WooHooo!! A-Line Skirt Pattern Finds

Sweet Coin Purse Tutorial for Teacher Gifts

This time of year is so special to me because I get to show my gratitude for all of the hard work that goes into teaching my daughters. I love to make handmade gifts and this year is no exception. Since money does not grow on trees around here, I looked at my stash (I keep my scraps in hat boxes ) and tried to see what I had a lot of; small zippers, trims, Peltex strips ( from making iPad cases ), fabric scraps and some hardware for key fobs. So I set to work.  Materials: Plastic multipurpose 5" Zipper  Fabric Scraps Lightweight interfacing 808 Pellon Trims (We clipped  key fobs  with 1.5" swivel hooks onto our coin purses . There are tons of tutorials on making key fobs .) Step 1: Print out the Coin Purse Template  PDF.  Cut 2 main fabric, cut 2 lining and 2 interfacing using the template.  Optional: Cut a 2"X2" square of your choice main fabric or lining. This strip of fabric is used to clip a key fob to your coin purse later. We used a 1.5